6
OPERATING INSTRUCTIONS
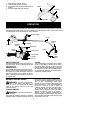
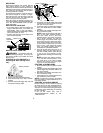
OPERATING POSITION
Eye Protection
Long Pants
Heavy Shoes
ALWAYS WEAR:
Cut from your right to your left.
WARNING:
Always weareye protec-
tion. Never lean over the trimmer head.
Rocks ordebris canricochet orbe thrown into
eyes and face and cause blindness or other
serious injury.
Do not run the engine at a higher speed than
necessary. The cutting line will cut efficiently
when the engine is run at less than full throttle.
At lower speeds, there is less engine noise and
vibration. The cutting line will last longer and w ill
be less likely to “w eld” onto the spool.
Always r elease the throttle trigger and allow the
engine to return to idle speed when not cutting.
To stop engine:
S
Release the throttle trigger.
S
Push and release the engine ON/STOP
switch.
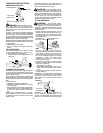
TWIST AND EDGE
The T wist and Edge feature allows for easy
edging of sidewalks, patios, driveways, etc.
1. Pull the tab tow ar d the engine.
2. Tw ist the tube to the edging position; re-
lease tab.
Tab
TRIMMER LINE ADVANCE
Thetrimmer line will advance approximately 2
in. (5 cm)each time the bottom of the trimmer
head is tapped on the ground with the engine
running at full throttle.
The most ef ficient line length is the maximum
length allowed by the line limiter.Always keep
the shield in place when the tool is being oper-
ated.
To advance line:
S
Operate the engine at full throttle.
S
Hold the trimmer head parallel to andabove
the grassy area.
S
Tap the bottom of the trimmer head lightly
on the ground one time. Approximately 2 in.
(5 cm) of line will be advanced with each
tap.
Always tap the trimmer head on a grassy
area. Tapping on surfaces such as concrete
or asphalt can cause excessive wear to the
trimmer head.
If the line is worn down to 2 inches (5 cm) or
less, m ore than one tap will be required to ob-
tain the most efficient line length.
WARNING:
Use only 0.080” (2 mm)
diameter line. Other sizes and shapes of line
will not advance properly and will result in im-
proper cutting head function orcan cause se-
rious injury. Do not use other materials such
as wire, string, rope, etc. Wire can break off
during cutting and become a dangerous mis-
sile that can cause serious injury.
CUTTING METHODS
WARNING:
Use minimum speed
and do not crowd the linewhen cutting around
hard objects (rock, gravel, fence posts, etc.),
which can damage the trimmer head, become
entangled in the line, or be thrown causing a
serious hazard.
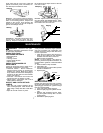
S
The tip of the line does the cutting. You will
achieve the best performance and mini-
mum line wear by not crowding the line into
the cutting area. The right and wrong ways
are shown below.
Tip of the Li ne
Does The Cutting
Right Wrong
Line Crowded Into
Work Area
S
The line will easily remove grass and
weeds from around walls, fences, trees and
flower beds, but it also can cut the tender
bark of trees or shrubs and scar fences. To
help avoid damage especially to delicate
vegetation or trees with tender bark,
shorten line to 4--5 in. (10--13 cm) and use
at less than full throttle.
S
For trimming or scalping, use less than full
throttle to increase line life and decrease
head wear, especially:
S
During light duty cutting.
S
Near objects around w hich the line c an
wrap such as small posts, trees or fence
wire.
S
For mowing orsweeping, usefull throttle for
a good clean job.
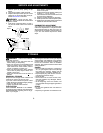
TRIMMING -- Hold the bottom of the trimmer
head about 3in. (8cm) above the ground and
at an angle. Allow only the tip of the line to
make contact. Do not force trimmer line into
work area.
Trimming
3in.(8cm)
Above Ground
SCALPING -- The scalping technique re-
moves unwanted vegetationdown to the
ground. Hold the bottom of the trimmer head
about 3in. (8 cm) above the ground and atan


