


4
DOUBLE INSULATION
CONSTRUCTION
This unit is doubleinsulated tohelp pro-
tect against electric shock. Double in-
sulation construction consists of two
separate “layers” of electrical insulation
instead of grounding.
Tools built with this insulation system
are not intended to be grounded. No
grounding means is provided on this
unit, nor should a means of grounding
be addedto this unit. As aresult, theex-
tension cord used with your unit can be
pluggedinto anystandard 120voltelec-
trical outlet.
Safety precautions must be observed
when operating anyelectrical tool. The
double insulation system only provides
added protection against injury result-
ing from an internal electrical insulation
failure.
WARNING:
All electrical repairs to
this unit, including housing, switch, mo-
tor, etc., must be diagnosed and re-
paired by qualified service personnel.
Replacement parts for a double insu-
lated appliance must be recommended
bythe manufacturer.Adouble insulated
appliance is marked with the words
“double insulation” or “double insu-
lated”. The symbol (square within a
square)
mayalsobemarkedonthe
appliance. Failure to have the unit re-
paired by qualified service personnel
can cause the double insulation
construction to become ineffective and
result in serious injury.
SAVE THESE INSTRUCTIONS
ASSEMBLY
WARNING:
If received as-
sembled, review all assembly steps to
ensure your unit is properly assembled
and all fasteners are secure.
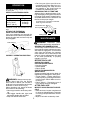
ADJUSTING ASSIST HANDLE
S
Loosen wing nut on handle.
S
Rotate the handle on the tube to an
upright position; place in a comfort-
able position and retighten wing nut.
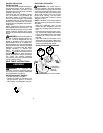
ATTACHING THE SHIELD
WARNING:
The shield must be
properly installed. The shield provides
partial protection from therisk of thrown
objects to the operator and others. Your
unit is equipped with a line limiter blade,
which cuts excess line to the proper
length while running. The line limiter
blade (on underside of shield) is sharp
and can cut you.
NOTE:
If shieldis notproperly installed,
damage to unit (including motor failure)
will result.
S
Align the installation arrow on the
shield with the installation arrow on
the motor housing(see illustration be-
low).
S
Insert the shield onto the motor hous-
ing. Ensure thecutting head remains
free to rotate andthe line is notcaught
between the shield and the motor
housing.
S
Twist the shield as illustrated until it
snaps securely into place. Make sure
the shield is assembled to the unit as
shown in the illustration below.
CAUTION:
Shar
p
line limiter blade
ALIGN INSTALLATION ARROWS
Twist shield
in direction of
arrow to
assemble