11
5
WARNING
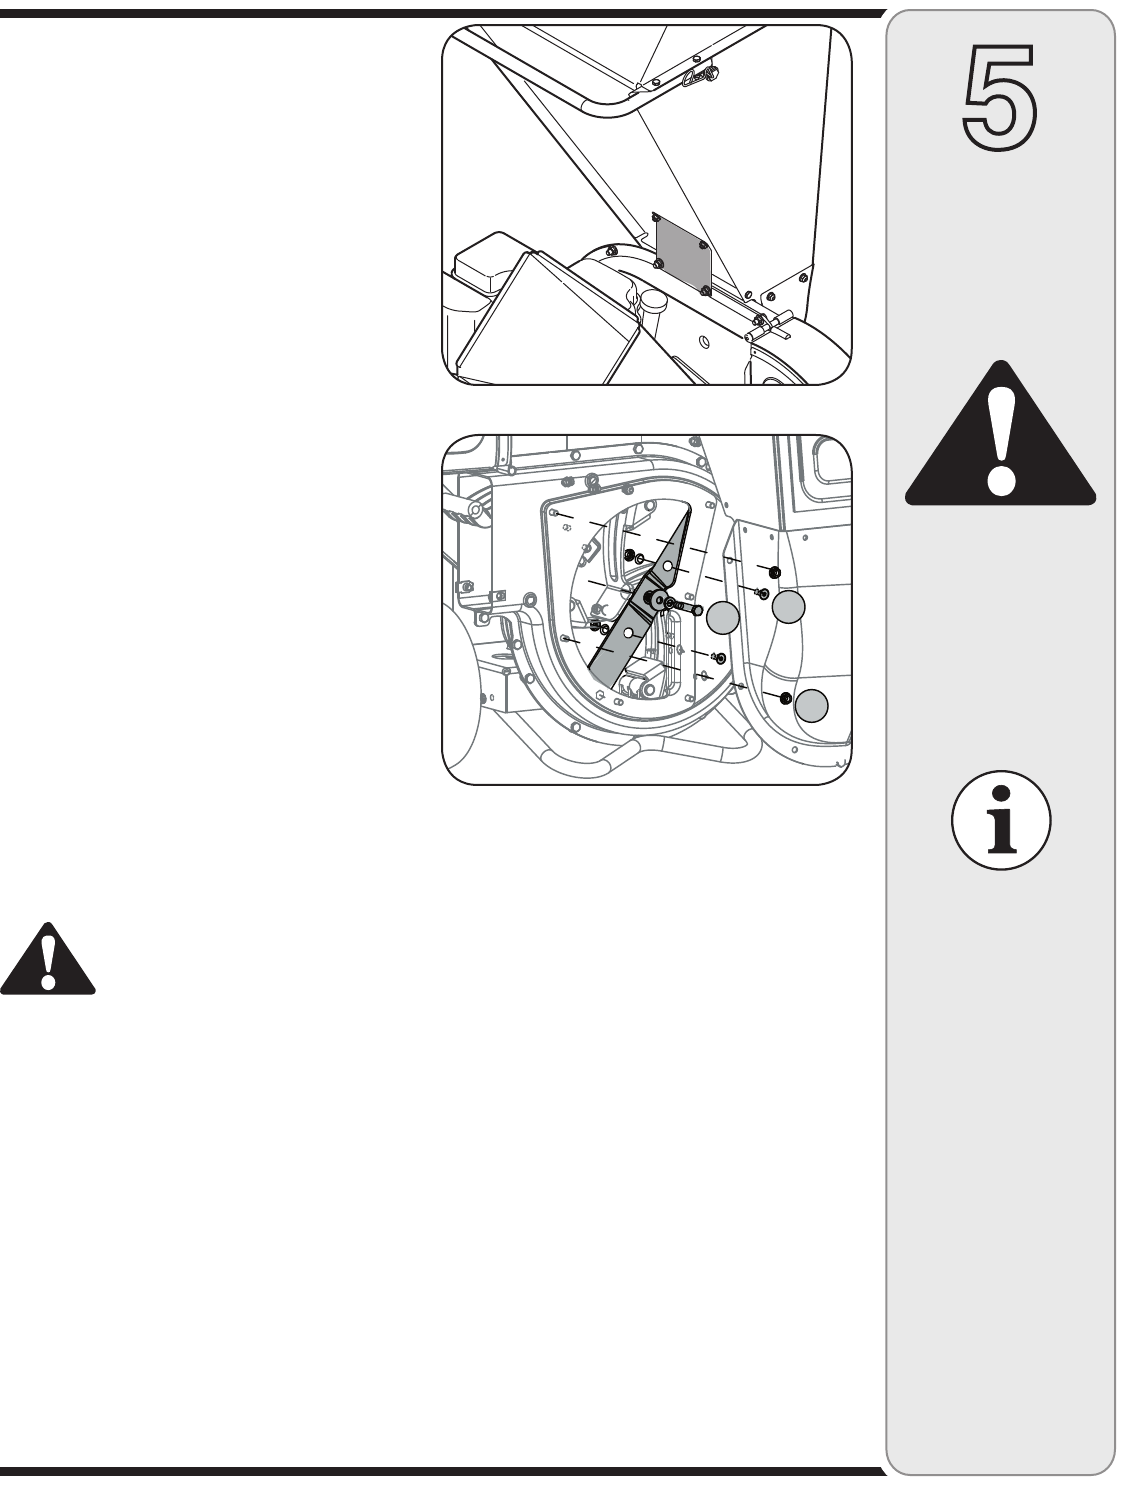
Figure 10
Figure 11
The shredder blade is
sharp. Wear leather
work gloves to
protect your hands.
Maintaining
Your Chipper
Shredder
IMPORTANT
Make certain chipper
blades are reassem-
bled with the sharp
edge outward (toward
the chipper chute).
Torque hardware to
between 20 ft.-lbs and
25 ft.-lbs.
2. Pivot the shredder screen upward as instructed under
the heading Cleaning the Reduction Chamber.
3. a. Remove the chipper chute support brace from the
frame by removing the two hex bolts and saddle
washers which secure it. See Figure 9.
b. Remove the chipper chute by removing three hex
nuts and washers which secure it to the impeller
housing. See Figure 9.
• Rotate the impeller by hand until one of the two
chipper blades is visible through the impeller
housing opening.
c. Remove the blade by removing the internal hex
screws, lock washers and hex nuts which secure it
to the impeller. Retain the hardware.
NOTE: Use a 3/16” hex key (Allen) wrench on the outside
of the blade and a 1/2” box (or socket) wrench on the
inside of the impeller. Hold the Allen wrench stationary
and rotate the box (or socket) wrench to loosen the nut.
4. Install a replacement blade (Part No. 742-0544) with
the hardware removed earlier or sharpen.
IMPORTANT: When sharpening the blade, protect hands
by using gloves. Follow the original angle of grind and
make sure to remove an equal amount from each blade.
5. To replace the other blade, rotate the impeller to
expose the second blade and repeat the steps above.
NOTE: Make certain blades are reassembled with the
sharp edge outward (toward the chipper chute). Torque
hardware to between 20 ft.-lbs and 25 ft.-lbs.
Sharpening Or Replacing The
Shredder Blade
WARNING: The shredder blade is sharp.
Wear leather work gloves to protect
your hands.
1. Stop engine,disconnect spark plug, and make certain
that all moving parts have come to a complete stop.
2. Remove the two flange nuts (and hex bolts) which
secure the hopper support bracket to the impeller
housing. Retain the hardware. See Figure 10.
3. Pivot the shredder screen upward as instructed under
the heading Cleaning the Reduction Chamber
.
4. a. Remove six flange nuts which secure hopper inlet
guide to impeller housing. See Figure 11.
• Carefully separate the hopper assembly from the
impeller housing and set it aside.
• Insert a piece of wood into the chute deflector
opening to stabilize the impeller and prevent it from
rotating when removing the shredder blade.
b. Remove the two internal hex screws, hex lock nuts,
and lock washers which secure the shredder blade
to the impeller. See Figure 11.
NOTE: Use a 3/16” hex key (Allen) wrench on the
outside of the shredder blade and a 1/2” box (or socket)
wrench on the inside of the shredder blade. Hold the
Allen wrench stationary and rotate the box (or socket)
wrench to loosen the nut.
c. Remove the hex bolt, lock washer, and flat washer
to completely free shredder blade. See Figure 11.
IMPORTANT: If sharpening the blade for reuse, follow
the original angle of grind as a guide. Make certain each
cutting edge receives an equal amount of grinding to
prevent an unbalanced blade. Remove metal from the
heavy side until it is balanced evenly.
IMPORTANT: When reassembling the blade, tighten
center bolt to between 45 ft.-lbs and 60 ft.-lbs and the
two out bolts to between 20 ft.-lbs and 25 ft.-lbs.
Storing Your Chipper Shredder
1. Clean the equipment thoroughly.
2. Wipe equipment with an oiled rag to prevent rust.
3. Refer to engine manual for correct engine storage
instructions
4. Store unit in a clean, dry area. Do not store next to
corrosive materials such as fertilizer.
IMPORTANT
When reassembling the
shredder blade, tighten
center bolt to between
45 ft.-lbs and 60 ft.-lbs
and the two out bolts to
between 20 ft.-lbs and
25 ft.-lbs.


