


7
Attaching The Blower Chute (If Equipped)
NOTE: The blower chute is an optional feature on some
model yard vacuums. It is NOT standard equipment. If
your unit is not equipped with a blower chute, contact
Customer Support as instructed on page 2 for
information regarding price and availability.
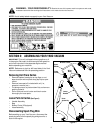
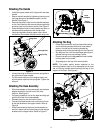
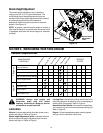
• Grasp blower chute with one hand and slide locking
rod on mounting bracket with other hand toward
engine. Use end of mounting bracket as leverage
when sliding the locking rod. See Figure 5.
• Slip blower chute over rim of the discharge opening
and release locking rod to secure chute in place.
Make sure the safety switch button is fully
depressed by the front tab on the blower chute.
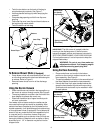
• Raise the nozzle height to the highest setting when
using the blower chute. Refer to nozzle height
adjustment in the OPERATION section.
Figure 5
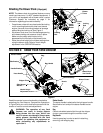
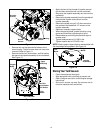
SECTION 3: KNOW YOUR YARD VACUUM
Figure 6
Read this operator’s manual and safety rules before
operating your Yard Vacuum. Compare the illustrations
in Figure 6 with your unit to familiarize yourself with the
location of various controls and adjustments.
WARNING: The operation of any Yard
Vacuum can result in foreign objects
being thrown into the eyes, which can
result in severe eye damage. Always wear
safety glasses, provided with the Yard
Vacuum, for operating this equipment or
while performing any adjustments or
repairs on it.
Starter Handle
The starter handle is attached to the right upper handle.
Stand behind unit and pull the starter handle to start
engine.
Bag
Collects shredded material fed through the chipper
chute or vacuumed through the nozzle or hose.
Bag Handle
Used to grasp bag in order to assist in attaching,
removing, and emptying bag.
Safety
Switch
Locking
Rod
Locking
Rod
Blower
Chute
Front
Tab
Button
Blower Chute*
Nozzle/Hose
Vac Handle
Starter Handle
Bag Handle
Bag
Chipper Chute
Nozzle Height
Adjustment Lever
Nozzle
Hose Handle
Hose Assembly
Side Bracket
Handle Bracket
Side Hanger
Bracket
*If Equipped