Servicing Procedures
Introduction
The 690 Series rotary sprinkler is designed to provide the user trouble free operation for many years without
scheduled maintenance. Should it become necessary to disassemble the sprinkler to correct a malfunction or
replace a component, all internal parts of the sprinkler are accessible from the top. Refer to the Troubleshooting
Procedure in this manual in the event of a malfunction. Some special tools are required for disassembly and/or
maintenance of the sprinkler and are available from your Toro dealer.
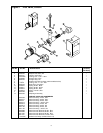
Servicing Sprinkler Mechanism and Valve Assembly
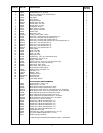
(Refer to Figure 8 for the following procedure.)
1. Remove rubber cap plug (1) if installed.
2. Remove machine screw (2) and cap (4).
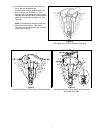
3. Using snap ring pliers (P/N 995-07), remove head snap ring (11).
4. Grasping nozzle base (9), pull sprinkler mechanism out of body.
Note: Due to O-ring seal compression between drive assembly and body, considerable resistance may be felt
when removing sprinkler mechanism.
5. Unhook and remove retraction springs (6) from spring strap (5) and spring collar (14).
6. To remove nozzle base assembly, hold riser and riser pliers (P/N 995-17) and turn nozzle base assembly
counterclockwise.
7. Using appropriate size end wrenches, turn nozzles counterclockwise to remove from nozzle base.
8. Carefully pull stream straightener (8) out of nozzle base using needle nose pliers.
9. To remove stator (15), insert screwdriver blade between stator and drive assembly housing (13) and pry apart.
Note: A small notch for screwdriver blade insertion is provided on edge of stator.
10. Thoroughly clean and inspect all parts. Replace parts as required.
Note: If changing nozzle to a different size, appropriate stator must also be installed to ensure proper rotation
speed and coverage.
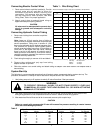
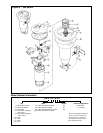
11. To remove valve assembly, squeeze ears of snap ring together with snap ring pliers (P/N 995-07) and remove
snap ring from sprinkler body. (See Figure 4).
CAUTION
If snap ring is difficult to remove, there may be residual water pressure in the system. Recheck the water
supply to insure it is turned off and all pressure has been totally eliminated before removing the snap
ring and valve.
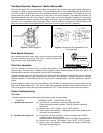
12. Use valve removal tool (P/N 995-08) to remove valve assembly from base of sprinkler body. Valve Removal Tool
is inserted into sprinkler body and pushed through valve ribs to the underside of valve. A slight twist will lock
tool to valve enabling removal by pulling straight up and out. (See Figure 5.)
NOTE: If valve removal tool is not available, use snap ring pliers to grasp rib of valve assembly and pull up and
out of sprinkler body.
6
WARNING
TO PREVENT POSSIBLE INJURY DURING SPRINKLER SERVICING PROCEDURES,
CONFIRM THE FOLLOWING CONDITIONS EXIST PRIOR TO STARTING.
A. WATER SUPPLY TO SPRINKLER IS SHUT OFF AT SOURCE.
B. SYSTEM PRESSURE IS BLED FROM SYSTEM, INCLUDING CONTROL TUBES.
C. A.C. POWER IS DISCONNECTED AT SOURCE
WARNING
POSITIVELY SHUT OFF WATER SUPPLY AT SOURCE PRIOR TO REMOVING VALVE
ASSEMBLY. BLEED ALL PRESSURE FROM SYSTEM INCLUDING CONTROL TUBES.
FAILURE TO DEPRESSURIZE SYSTEM PRIOR TO SNAP RING REMOVAL COULD
CAUSE VALVE MECHANISM TO EJECT FROM SPRINKLER BODY UNDER
PRESSURE RESULTING IN POSSIBLE SERIOUS INJURY TO PERSONNEL.


