


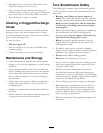
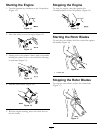
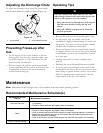

Inspecting the Rotor Blades
Service Interval: Yearly
Before each season, inspect the rotor blades for wear.
When a rotor blade edge has worn down to the wear
indicator hole, have an Authorized Service Dealer
replace the rotor blades and the scraper (Figure 22)
Figure 22
1. Wear indicator hole
Storage
Storing the Snowthrower
• Gasoline fumes are highly ammable,
explosive, and dangerous if inhaled. If you
store the product in an area with an open
ame, the gasoline fumes may ignite and
cause an explosion.
• Do not store the snowthrower in a house
(living area), basement, or any other area
where ignition sources may be present,
such as hot water and space heaters, clothes
dryers, furnaces, and other like appliances.
Important: Do not use the chute handle to lift the
snowthrower. This can damage the chute handle.
1. Add a fuel stabilizer/conditioner to the fuel in the
fuel tank as directed.
Note: If you use Toro 50:1 2-Cycle Oil (Fuel
Stabilizer Added), you do not need to add a fuel
stabilizer/conditioner.
2. Run the engine for 5 minutes to distribute the
conditioned fuel through the fuel system.
3. Stop the engine and allow it to cool.
4. Use a hand pump to pump the fuel from the fuel
tank into an approved fuel container, or run the
engine until it stops.
5. Start the engine and run it until it stops.
6. Choke or prime the engine, start it a third time, and
run the engine until it will not start.
7. Slowly pull the recoil starter until you feel resistance
due to compression pressure, then stop.
8. Release the starter tension gradually by allowing the
rope to go back slowly to prevent the engine from
reversing due to compression pressure.
9. Dispose of unused fuel properly. Recycle it according
to local codes, or use it in your automobile.
Note: Do not store stabilized fuel for more than
90 days.
10. Tighten all loose screws, bolts, and locknuts. Repair
or replace any damaged parts.
11. Clean the snowthrower thoroughly.
12. Cover the snowthrower and store it in a clean, dry
place out of the reach of children. Allow the engine
to cool before storing it in any enclosure.
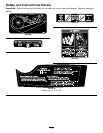
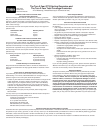
Folding the Handle
1. Loosen the knobs and pull out the handle bolts.
2. Fold the upper handle forward (Figure 23).
Figure 23
11