


AirFilter
The engine is equipped witha replaceable, high density
paper air cleaner element. Always examine the air
cleaner before starting the engine. Check for a
buildup of dirt and debris around the air cleaner system.
Keep this area clean. Also check for loose or damaged
components. Replace all bent or damaged air cleaner
components.
NOTE: Starting the tractor with loose or damaged air
cleaner components could allow unfiltered air into the
engine causing premature wear and failure.
Service Paper Element
The paper element should be replaced at least once a
season, or every 100 hours of operation. Replace
more frequently if the tractor is operated under
extremely dusty conditions. To replace the paper
element, proceed as follows:
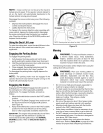
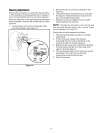
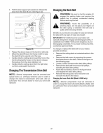
1. Loosen the air cleaner cover knob and remove the
cover. See Figure 18.
,
3.
Figure 18
Remove the air cleaner element.
Remove the precleaner from the element and
service as instructed earlier in this section.
IMPORTANT: Do not wash the paper element or use
pressurized air, as this will damage the element.
Examine the element and discard if dirt and/or damage
is present.
NOTE: Handle new element carefully; do not use if
the sealing surfaces are bent or damaged.
,
If any loose dirt or debris fell on the air cleaner base
when the element was removed, carefully remove it
and wipe the base clean. Be careful that none of it
drops into the intake.
5. Check the air cleaner base. Make sure it is secured
and not damaged. Also check the air cleaner cover
for damage or improper fit. Replace all damaged air
cleaner components.
6. Install the precleaner over the new paper element
and reinstall the element.
7. Reinstall the cover and tighten the knobs securely.
SparkPlug
Every two years or 200 hours of operation, remove the
spark plug, check its condition, and reset the gap or
replace with a new plug as necessary. Spark plug
replacement is recommended at 500 hours.
1. Lift the tractor's hood by pivoting it forward.
NOTE: Removing the tractor's hood may ease the
following steps, but is not necessary.
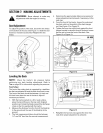
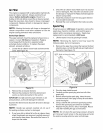
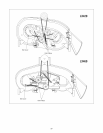
2. Remove the upper hex screws that secure the heat
shield in place, on both the left side and right side of
the tractor. See Figure 19.
NOTE:Hoodnot shownfor clarity.
Hex Screw
\
HeatShield
Figure 19
3. Pivot the heat shield forward.
4. Carefully pull the spark plug wire boot off of the
spark plug.
5. Before removing the spark plug, clean the area
around the base of the plug to keep dirt and debris
out of the engine.
6. Using a ratchet with a 5/8-inch spark plug socket,
remove the spark plug and check its condition.
7. Replace the plug if worn, dirty or damaged. Reuse
only after resetting the gap as instructed.
NOTE: Do not clean the spark plug using an abrasive
grit. Some grit could remain in the spark plug and enter
the engine causing extensive wear and damage.
24