Texas Weather Instruments, Inc. 3 WRL Instruction Manual
collector unencumbered by surrounding obstacles. Use a bubble level to make sure that
the collector is perfectly level with the ground. Failure to level the collector will cause
inaccurate rainfall readings. The rain collector has one blue cable, which must be
connected to the console via the junction box.
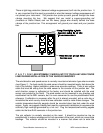
Mount the junction box under the rain collector using the hose clamps that are installed on
the box (see figure 1)and remove the front cover of the junction box. Next insert the
connectors from the sensors and the cables from the console through the hole in the bottom
of the junction box and then out the front of the box. Plug all the yellow connectors into the
yellow RJ45 connectors and all the blue connectors into the blue RJ-45 connectors and
then pull the excess cable out of the junction box (j-box). Be sure and replace the rubber
gasket on the junction box so that it can remain watertight.
Plug the yellow intermediate cable (wind) into the yellow pigtail exiting the back of the
console. Do the same for the blue cable (temp/humidity & rain). Next, plug in the serial
cable into the connector in the rear of the console and the proper serial port of your
computer. If you are supplying your own serial cable, be sure that either you have a null
modem adapter attached to the cable or that the cable is a null modem cable. The cable
supplied with the WRL will have four connectors or will be marked with a green
color on one of the cable connectors. Plug the wall transformer into a 120V wall socket
to power up the unit.
The optional solar sensor must be pointed to the South and must be free of shadows
created by the other sensors (Near the top of the mast is normally the best). Take
care that the sensor is perfectly level. The solar sensor has one red cable. Run the
red solar sensor cable to the junction box and plug it in to the red connector in the j-
box. Run the red intermediate cable to the console and plug it into the j-box.


