


OWNER’S MANUAL
INSTALLING THE GEARBOX SWEEPING ATTACHMENT
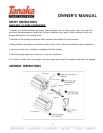
1. Make sure all the components are included in the box. The box should contain:
a. Gearbox (1)
b. Drum Assemblies (2)
c. Drum Axle (2)
d. Clevis Pin (2)
e. Hitch Pin (2)
f. Cotter Pin (2)
g. Shaft Protector (2)
h. Gearcase Spacer (1)
2. Slide the rubber sleeve drive shaft protector onto the drive shaft pipe housing. This sleeve will protect the
drive shaft pipe from repeated contact with the rubber paddles. The protector can be slid up the drive shaft pipe
housing during installation, but should be slid down to rest on top of the gear case before use.
3. Insert the end of the drive shaft housing into the gearcase and push it until it bottoms. The drive shaft tube
should go into the gearcase about 1 - 1.5 inches. If the drive shaft housing stops before bottoming, rotate it
until you feel the inner drive shaft splines engage the gearcase. Then push the drive shaft all of the way in.
4. All Tanaka trimmers use a locator screw to properly position the gear case, (in addition to the pinch bolt which
tightens the gear case to the shaft). Some trimmer models do not have the locator screw and hole in the correct
place for mounting the sweeper gear case. In this instance, an additional hole will need to be drilled. Insert the
shaft pipe all the way into the sweeper gear case, and mark the center of the locator bolt hole. Remove the drive
shaft pipe, and use the existing gear case hole to ensure you have the new hole properly centered (to ensure the
gear case is straight). Using a 6mm (3/8”) drill bit, drill the new locator hole in the drive shaft pipe.
5. Use a 4mm hex (Allen) wrench to tighten the gearcase positioning screw first, then the gearcase clamp screw.
6. Push one of the drum axles onto either of the two gearcase output shafts. If necessary, rotate the drum axle
until the clevis pin hole in the axle aligns with the matching hole in the gearcase output shafts.
7. Use a clevis pin and hitch pin to secure the drum axle to the shaft.
8. Slide the recessed end of a sweeper drum assembly over the installed axle, and then push the drum down the
axle until the cotter pin hole in the axle extends above the drum surface.
Important Note: The two drum assemblies are identical, but each drum must be
installed with the recessed end facing toward the gearcase.
9. Use a cotter pin to secure the drum assembly on the axle. The cotter pin is designed to fit tightly against the
outboard end of the drum, so you may need to compress the drum face slightly during installation. Spread the
ends of the cotter pin to secure.
10. Repeat steps 7 - 10 to install the remaining axle and drum assembly.
- 5 -