


35
ENGLISH
EN
• Disengage the auger when the snow thrower is to be
transported or is not in use Do not drive too fast on
slippery surfaces when transporting.
• Only use accessories that are approved by the machine’s
manufacturer.
• Never drive the snow thrower in bad visibility or without
satisfactory lighting.
• Always ensure you have a good balance and a tight grip
on the handle.
• Never use the snow thrower on a roof.
• Do not touch engine components because they are warm
during use. Risk of burn injuries.
2.4 MAINTENANCE AND STORAGE
• Tighten all nuts and screws so that the machine is in safe
working condition. Check the shear bolts regularly.
• Always use genuine spare parts. Non-genuine spare parts
can entail a risk of injury, even if they fit the machine.
• Never store the machine with petrol in the tank in
buildings where the fumes can come into contact with
open flames or sparks.
• Allow the engine to cool before putting the machine in
store.
• Before a long storage, check the instructions for
recommendations.
• Replace damaged warning and instruction stickers.
• Let the engine run a couple of minutes with the auger
connected after use. This prevents the auger from
freezing solid.
3 ASSEMBLY
Note: References to left and right sides are based on the
driver’s position behind the snow thrower.
WARNING: The spark plug cable must always be
disconnected be carrying out assembly or
maintenance work.
3.1 Unpacking
1. Locate and unpack all parts that are packed separately in
the carton.
2. Remove the packaging around the snow thrower.
3. Cut down all four corners of the carton and lay the side
panels flat.
4. Grasp the lower handle and pull the snow thrower off the
carton.
5. Remove the packaging around the handles.
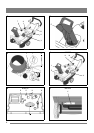
3.2 Handle
1. Remove the packaging from the upper and lower
handles.
2. Loosen the knobs (1:A) on each side of the handle (1:B).
3. Raise the upper handle (1:B) to the operating position.
Hold the upper handle apart to prevent scratching the
lower handle.
Attention! Make sure that the cables are not trapped between
the upper and lower handles.
4. Tighten the knobs (1:A).
5. Only applies to BREEZE: Cut off the cable tie (2:C) from
the lower end of the discharge chute’s control rod.
6. Turn the deflector (2:D) towards the front of the snow
thrower.
3.3 Discharge chute (3:E)
Install the discharge chute (3, 5:E) as follows:
1. Position the chute above the opening.
2. Install the screws and nuts (3:F, G).
3. Tighten all three screw joints on the discharge chute.
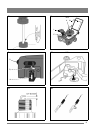
3.4 Adjustment lever (3:H)
Install the adjustment lever as follows:
1. Disconnect the cotter pin (3:I). Save the parts.
2. Install the end of the adjustment lever through the hole in
the mount (3:L).
3. Attach the adjustment lever to the mount with the cotter
pin (3:I).
4. Rotate the adjustment lever between its end positions.
Check that the discharge chute (2:E) rotates freely.
4 CONTROLS
SNOW BREEZE, see fig. 4-7.
SNOW REX, see fig. 7-10.
Adjustment lever (H)– Changes the direction of the
discharge chute.
Deflector (L) – Determines the distance the snow is thrown.
Discharge chute (E) – Determines the direction the snow is
thrown.
Auger drive lever (M) – Starts and stops the auger/impeller
which propels the snow thrower.
Stop control (N) – Must be switched to the ON position to
start the engine.
Primer (O) – Injects fuel directly into the carburettor for
starting in cold weather.
Starter button (P) – Used to start the engine on models with
electric starter.
Switch box (not shown)– Used on models with electric
starter for 220 volt connection.
Starting handle (Q) – Used to start the engine manually.
Choke (R) – Used when starting a cold engine.
Spark plug flap (S) – Remove to access the spark plug.
Refuelling (T) – Remove to fill with fuel.
Oil filling (U) – Remove to top up with oil.
Oil drainage (V) – Remove to access the dipstick.
Dipstick (fig. 8)– Remove to read the oil level and top up
with oil in the engine’s crankcase.
5 USING THE MACHINE
5.1 General
Never start the engine until all the above measures under
‘ASSEMBLY’ have been carried out.
Never use the snow thrower without first reading
and understanding the enclosed instructions and
all the warning and instruction stickers on the
snow thrower.
Always wear protective goggles or a visor during
use, maintenance and service.
5.2 Before starting
Some snow throwers are delivered without oil in the engine’s
crankcase. Oil is supplied in a separate bottle for these.
Fill the engine with oil before using.