


ENGLISH
GB
Briggs & Stratton LS 45 (fig. 21): Carefully re-
move the air cleaner so that no dirt falls down into
the carburettor. Take out the foam-plastic filter and
wash it in liquid detergent and water. Dry the filter.
Pour a little oil on the filter and squeeze it in. Refit
the air cleaner.
Clean the filter every three months or after every
25 hours of use, whichever occurs first. More often
if the lawn mower is used on dusty ground.
Briggs & Stratton ES 45, XTE 50 (fig. 22):
Loosen the screw and fold down the cover of the
air cleaner. Carefully remove the filter cartridge.
Knock it against a flat surface. Replace the filter
cartridge with a new one if it is still dirty.
Clean the filter every three months or after every
25 hours of use, which ever occurs first. More of-
ten if the lawn mower is used on dusty ground.
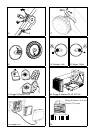
Honda GCV (fig. 23): Remove the cover and take
out the filter. Carefully check the filter for holes or
other damage. A broken or damaged filter must be
replaced.
To remove dirt, carefully knock the filter several
times against a hard surface or use compressed air
from the back of the filter to blow-clean. Do nottry
to brush the filter clean as this forces dirt downinto
the fibres. A very dirty filter should be replaced.
Clean the air filter after every 25 hours of use or
once a season. More often if the lawn mower is
used on dusty ground.
SPARKING PLUG
Never remove the spark plug or the igni-
tion lead when checking to see if there is
any spark, always use an approved test
instrument.
Clean the sparking plug regularly (every 100 hours
of use). Use a wire brush for cleaning.
Change the sparking plug if the electrodes are ex-
cessively burnt or if the plug is damaged. The rec-
ommendations of the engine manufacturers are as
follows (fig. 24):
Briggs & Stratton: Champion J19LM (RJ19LM).
Spark gap 0.76 mm.
Honda GCV: NGK BPR6ES.
Spark gap 0.7 - 0.8 mm.
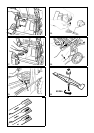
BATTERY (*)
Electrolyte in the battery is toxic and
corrosive. It can cause serious corrosion
damage etc. Avoid all contact with skin,
eyes and clothing.
In normal use during the season, the battery is
charged by the engine. If the engine cannot be
started with the starter key, it may be because the
battery is “dead”.
Remove the battery by releasing the the battery as-
sembly from the mower using a screwdriver
(fig. 25). Connect the enclosed battery charger to
the battery, and then connect the charger to a wall
socket and charge for 24 hours (fig. 26).
After charging, connect the battery's contactor to
the engine's contactor and reinstall the battery as-
sembly (fig. 27). Note! The battery charger must
not be connected to the engine terminal. The en-
gine cannot be started by using the charger as a
source of power supply, and the charger will be
damaged.
WINTER STORAGE
Remove the battery and store for the winter well-
charged (see above) in a dry and cool place (be-
tween 0° C and +15° C). At least once during the
winter storage period the battery should be mainte-
nance-charged.
Before the start of the season the battery should be
charged once again for 24 hours.
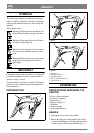
ADJUSTING THE CLUTCH CABLE (*)
If the drive does not engage when the coupling
clamp is pressed against the handle, or if the lawn
mower feels cumbersome or slow, the reason may
be that the coupling in the transmission slips. To
rectify this situation, adjust the clutch cable as fol-
lows:
1. Remove the transmission cover by unscrewing
the screws S (fig. 28).
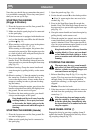
2. When the clutch loop is released it should be
possible to pull the mower backwards without
any resistance. If this is not the case, loosen the
locking nut U and screw in the nipple T until the
mower can be moved backwards (fig. 29).