


10
Section 3 – MAINTENANCE
WARNING
DO NOT attempt any adjustments, maintenance,
service or repairs with the engine running. STOP
engine. Remove spark plug wire from spark plug and
secure away from plug. Engine and components are
HOT. Avoid serious burns, allow all parts to cool before
working on machine.
3.1 INTRODUCTION
To retain the quality of the Yard Vacuum, use genuine
replacement parts obtained only through your
authorized dealer. Contact a local authorized dealer
for parts and service assistance. For the correct part
or information for a particular Yard Vacuum, always
mention the model/part number and serial number.
We recommend returning the Yard Vacuum to an
authorized dealer annually for inspection and addition
of any new devices, which might upgrade the safety of
the machine. For the nearest authorized dealer in your
area, check the yellow pages under the heading
LAWN MOWERS. For engine parts and service, look
for the engine manufacturer’s dealers under the
heading, ENGINES - gasoline.
3.2 SERVICE - AFTER FIRST 5 HOURS
Routine maintenance is important to the performance
and life of your Yard Vacuum. Service performed
properly and at the recommended interval is essential.
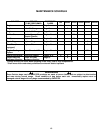
Refer to Section “MAINTENANCE SCHEDULE” in this
manual and in the Engine Owner’s Manual. Carefully
complete all of the recommended service procedures.
3.2.1. CHANGE ENGINE OIL
The design of the machine restricts access to the oil
drain plug on some model engines. The quickest
and cleanest method to drain the oil is to tip the
machine on its side, remove the dip stick, and allow
the oil to drain into a pan. Refer to the Engine
Owners Manual for recommended oil change
interval and oil specifications.
3.2.2. SERVICE ENGINE AIR CLEANER
The engine is equipped with a dual element air
cleaner. Both the foam pre-cleaner and cartridge
require service. Refer to Engine Owner’s Manual
for recommended service procedures.
3.2.3 INSPECT MACHINE
Carefully inspect entire machine for loose,
missing, damaged or worn parts. Run the machine
and check for unusual noise or vibration. After
stopping engine, open top of debris bag and
inspect the interior of the bag and the discharge
deflector end of the bag adapter. Repair or replace
debris bag, bag adapter, and machine as
necessary before operating. Contact your
authorized dealer for assistance.
3.3 SERVICE – EVERY 25 HOURS
Refer to Section “MAINTENANCE SCHEDULE” in this
manual and in the Engine Owner’s Manual. Carefully
complete all of the recommended service procedures.
3.4 STORAGE – OUT OF SEASON
DO NOT store machine or fuel container inside where
fumes may reach an open flame, spark or pilot light
such as in a water heater, furnace, clothes dryer or
other gas appliance. Allow engine to cool before storing
machine in an enclosure. Store fuel container out of
reach of children in a well ventilated, unoccupied
building. Refer to Sections “Safe Handling of Fuel” and
“Maintenance and Storage”, pages 2-3.
1. Thoroughly clean entire machine, engine and
debris bag.
2. Perform maintenance and lubrication as
required. Refer to Section “Maintenance
Schedule”.
3. With engine cool, drain fuel from fuel tank
outdoors into an approved container away
from all sources of ignition.
4. Run engine to remove all fuel from the
carburetor.
5. Refer to Engine Owner’s Manual for additional
engine storage procedures.