


21
SECTION 6 – ADJUSTMENTS & REPAIRS
WARNING
DO NOT attempt any maintenance, adjustments or
service with the engine running. Stop engine. Stop
blades. Lock Traction Levers. Remove key.
Disconnect spark plug wires from spark plugs and
secure wires away from spark plugs. Engine and
components are HOT. Avoid serious burns, allow
all parts to cool before working on machine.
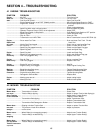
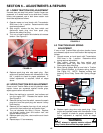
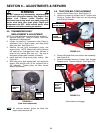
6.8 TRANSMISSION BELT
REPLACEMENT & ADJUSTMENT
NOTE: For belt adjustment, proceed directly to step 5.
1. Remove Deck belt. Refer to Section “Deck Belt
Adjustment & Replacement”.
2. Loosen nut securing Transmission Idler Pulley to
adjustment slot in engine base, and slide pulley
away from belt. See Figure 6.11.
3. Remove old belt from transmission pulley and
engine pulley. NOTE: Blade clutch wiring harness
will need to be unplugged from main harness in
order to fully remove belt from unit. Be sure to
reconnect harness after new belt is installed.
4. Install new belt, using same pulley routing. See
Figure 6.11.
5. Slide idler pulley back against belt, and adjust belt
tension. Belt should have 10 lbs. pressure with a
3/8” deflection. Tighten pulley nut when correct
tension is achieved.
FIGURE 6.11
(View from underneath)
NOTE: All mid-size mowers should be tilted with
engine carburetor side UP.
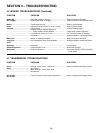
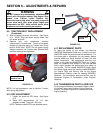
6.9 TRACTION BELT REPLACEMENT
1. Remove Drive Pulley Cover. See Figure 6.12.
2. Remove nut securing forward end of Traction Idler
Spring to Traction Idler Pulley bolt, and slip spring
end off of bolt threads.
FIGURE 6.12
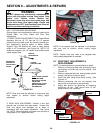
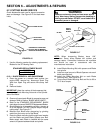
3. Remove Shoulder Bolt from traction idler assembly.
See Figure 6.13.
4. Remove hardware securing Traction Idler Support
Bracket to unit. Remove bracket. See Figure 6.13.
FIGURE 6.13
(Continued on next page)
CHECK
TENSION
HERE
IDLER
PULLEY
REMOVE DRIVE
PULLEY COVER
REMOVE
COVER
HARDWARE
REMOVE
SHOULDER
BOLT
REMOVE
HARDWARE
REMOVE
TRACTION
IDLER
SUPPORT
BRACKET
REMOVE
NUT AND
SPRING