


6
Snapper 3250 Watt Generator
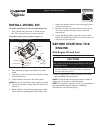
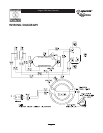
INSTALL WHEEL KIT
To install wheel kit you need the following tools:
• 15/16" (22mm) box, open end, or socket wrench
• Two 13mm box, open end, or socket wrenches
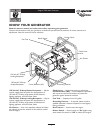
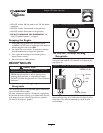
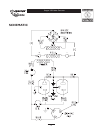
Install Wheel Kit as follows: (Refer to Figure 1)
1. Place bottom of generator cradle on a flat surface.
2. Place axle stud through wheel retainer on cradle
frame.
3. Use 15/16” wrench to secure the axle stud to frame
with 5/8-18 jam nut.
4. Install the other axle stud in the same manner.
NOTE: Be sure to install wheel with raised hub inboard.
5. Tip unit and install the wheel. Place flat washer over
axle stud.
6. Retain wheel on axle stud with retaining pin. Install
other wheel on remaining axle shaft the same way.
7. Attach the vibration mount to the mounting leg with a
capscrew and lock nut.
8. Remove two front nuts from vibration mount on unit
with 13mm wrench. Use these nuts to retain the
mounting leg.
9. Center the lifting handle on generator end of cradle.
Attach the handle using two 13mm wrenches with two
capscrews and two hex nuts.
BEFORE STARTING THE
ENGINE
Add Engine Oil and Fuel
• Place generator on a level surface.
• Refer to engine owner’s manual and follow oil and fuel
recommendations and instructions.
NOTE: Check oil often during engine break–in. Refer to
engine owner’s manual for recommendations.
NOTE: The generator assembly rotates on a prelubricated
and sealed ball bearing that requires no additional
lubrication for the life of the bearing.
Capscrew
Handle
Grip
Nut
Mounting Leg
Use Existing
Fasteners to
Secure Leg
Jam Nut
Retaining Pin
Wheel
Washer
Axle Stud
Figure 1 — Installing the Wheel Kit
Capscrew
Vibration Mount
Nut
CAUTION
• Refer to engine manual for oil and fuel fill information.
• Damage to equipment resulting from failure to follow this
instruction will void warranty.
Any attempt to crank or start the engine before it has
been properly filled with the recommended oil will result
in equipment failure.