


26
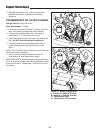
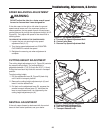
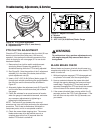
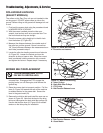
Figure 24. Parking Brake Adjustment
A. Brake Spring
B. Set Collar
C. Locknut
PARKING BRAKE ADJUSTMENT
1. Disengage the PTO, stop the engine, block the front
wheels, remove the ignition key, and engage the
parking brake.
2. Elevate the rear end of the unit and remove the rear
wheels.
3. Check the brake spring (A, Figure 24) length (both
wheels). With the brake engaged the compressed
spring length should be 2” (5 cm). If not, adjust the
locknut (C, Figure 24) to achieve the compressed
spring length of 2” (5 cm).
4. After achieving the correct spring compression, check
the set collar gap (B, Figure 24). With the parking
brake engaged, the set collar gap should be 3/16"
(5 mm). If not, loosen the set collar screw and move
the collar to the correct position.
A
B
C
Troubleshooting, Adjustments, & Service
C
A
B