


4
Initial Hitch Installation -
Models with out 3-Point Hitch
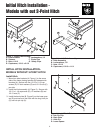
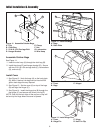
Figure 1. Install Side Brackets
A. Side Brackets E. Lockwashers, 1/2
B. Spacers F. Clevis Pins
C. Nuts, 1/2-13 G. Safety Clips
D. Capscrews, 1/2-13 x 2-1/2
A
F
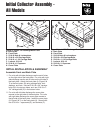
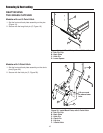
Figure 3. Install Back Plate
A. Hair Pin Clip
B. Back Plate
C. Hitch Pin
D. Lower Spacer
A
B
C
D
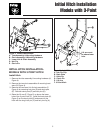
Figure 2. Install Hitch Assembly
A. Hitch Assembly
B. Lockwashers, 1/2
C. Nuts, 1/2-13
D. Capscrews, 1/2-13 x 1-1/4
C
A
D
INITIAL HITCH INSTALLATION -
MODELS WITHOUT 3-POINT HITCH
Install Hitch
1. Mount two side brackets (A, Figure 1) to the same
side of the frame placing spacers (B) between side
brackets (A). Secure with two 1/2-13 x 2-1/2 cap-
screws (D) 1/2 lock washers (E) and 1/2-13 nuts (C)
per side.
2. Install the hitch assembly (A, Figure 2). Secure with
1/2-13 x 1-1/4 capscrews (D), 1/2 washers (B) and
1/2-13 nuts (C)
3. Install the back plate (B, Figure 3) on the lower spac-
ers (D) and secure to the hitch with the long hitch pin
(C) and hair pin clip (A).
A
B
G
D
E
C
B