


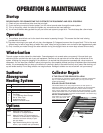


Startup
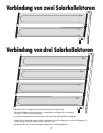
REVIEW PAGE 2 FOR CONNECTING THE SYSTEM TO THE EQUIPMENT AND POOL PROPERLY.
1) Check all your connections to be sure they are tight.
2) If you are using a manual diverter system, turn the valve to send water through the solar system.
3) Turn on the pump, check for leaks and tighten any connections that need attention.
4)
You will see air bubbles being pushed into your pool as the solar system is purged of air. This should stop after a few minutes.
Operation
1) The collector should feel cool to the touch when water is passing through. This means that the heat is being
transferred to the water.
2) The water returning to your pool will only be a few degrees (3-5 degrees) warmer than the pool itself. This is the most
efficient way to heat a large body of water like a pool. Keep turning the water over and add a few degrees each pass.
3) Only circulate your water through the solar collector during the daylight hours on warm days at least 6 hours daily.
Winterization
The solar system must be drained for winterization. Freeze damage is not covered under your warranty! You must drain your
collectors just like you drain the rest of your pool equipment. Remove an end cap to be sure all the water is drained out of the
system, including any low points (sagging) in the collectors. It is required that the system be evacuated with a shop vacuum or
compressor. You can leave the collectors in place (as long as they are completely drained) and they will withstand even the harshest
winters. It is recommended that you store your collectors in a warm dry place, to be certain that they don’t freeze. After draining, roll
up and handle carefully. Do not drag collector over rough surfaces. Damage to collector can occure and will void your warranty.
OPERATION & MAINTENANCE
Collector Repair
IF THE COLLECTOR DEVELOPS A LEAK
Your SunHeater is guaranteed against defects in materials and workman-
ship. If a leak develops for any other reason, you may use the repair
method shown below:
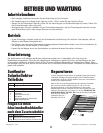
SOLAR COLLECTOR REPAIR
This method allows for an easy and permanent, on-site repair of a
collector by isolating the leaking riser tube. Referring to the figure below,
locate the tube to be isolated. (End tube has been shown for clarity)
Using a sharp utility knife, very carefully cut away approximately 1” of the
tube at both headers. Drive a #10 sheet metal screw, preferably stainless,
into the holes in the header. The screws must be between 1/2” and 3/4” long.
DO NOT OVERTIGHTEN! If the
screw strips out, or if the repair
leaks, use a #12 screw. This
repair method will not void
the collector warranty.
Qty Description
2 Quality Polypropylene Collectors
Item# Description
SK43 Mounting Kit for mounting
collectors on a sloped surface.
SK35 Manual Diverter FPT diverts water to
collectors or allows water to bypass the
collectors and return directly to pool.
(ask your dealer)
SK34 High Wind Mounting Kit for high wind
areas. (1 per collector-ask your dealer)
Options
4
Qty Description of SK42
2 Threaded Elbow Adapters
4 End Caps
4 1 1/4” Stainless Steel Clamps
1 Roll of Teflon Tape
1 Installation Manual
1 Rubber Connector Hose
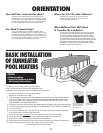
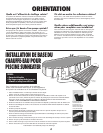
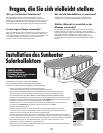
SunHeater
Aboveground
Heating System