


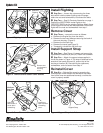

Install Flighting
❶ Step One — Loosen the nuts securing the three
bolts which hold the center flighting onto the auger.
retain the nuts and lockwashers, but discard the bolts.
❷ Step Two — See Kit Contents Illustration on page 1.
Position the ADDITIONAL center flights on the
OPPOSITE SIDE from the existing flighting. Attach these
to the auger with the the new bolts provided. Secure the
flights with the nuts and lockwashers from step 1.
Remove Cover
❸ Step Three — remove the cover as follows:
a. Remove the Engine Key from the switch.
b. Remove the two rear fasteners securing the back of
the cover housing. (Figure 2).
c. Remove the fuel tank cap.
d. Remove the cover (see Figure 3).
e. Temporarily reinstall the fuel tank cap.
Install Support Strap
❹ Step Four —See Figure 4. Loosen and remove the
capscrews at locations (A) and (B). Retain the hardware.
❺ Step Five — Attach the support strap supplied in
this kit as shown in Figure 4. The strap is attached to the
outside of the handle at locat (A), and ont top of the
housing at location (B). Secure with the capscrews,
lockwashers, and nuts saved from Step 4.
Reinstall Cover
❻ Step Six — Reinstall the cover by reversing the
removal steps.
Make certain that the tabs at the lower
front of the cover are positioned correctly, and that the
cover is properly seated.
Figure 4. Support Strap Installation
Figure 1. Flighting Installation
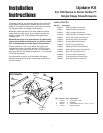
Update Kit
Figure 3. Cover Removal & Installation
Insert front
tabs first when
reinstalling
cover.
Align rear
tabs & side of
cover when
reinstalling.
Lift Cover
from Rear
of unit
A
B
Figure 2. Remove and/or loosen Cover Screws
Remove two
rear fasteners
securing
cover
Remove
Fuel Tank
Cap
Support Strap
1718357
Rev. 11/97
© 1997 Simplicity Manufacturing, Inc. All Rights Reserved
TP 200-2121-01-SK-S
MANUFACTURING, INC.
500 N Spring Street / PO Box 997
Port Washington, WI 53074-0997 USA
Loosen
Nuts
Additional
Flighting
Additional
Flighting
❶ ❷