


3
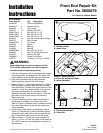
Installation Instructions
Kit Part No. 5600079
5100777
Rev. 07/2006
TP 200-7302-00-CI-S
© Copyright 2006 Ferris Industries. All Rights Reserved.
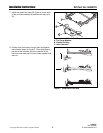
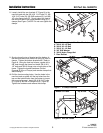
9. Loosely install the rear brackets (F, Figure 6) to the
new front end with the 3/8-16 X 1-1/4” bolts (C), 3/8-
16 X 3-1/2” bolts (B), 3/8 SAE washers (D), and 3/8-
16” nylon flange nuts (E). Snugly clamp the front of
the new front end to the cross member using (2) C-
clamps (See Figure 7).NOTE: Do not over tighten the
clamps.
Figure 6. Loosely Install the Rear Brackets
A. 3/8-16 X 2-1/2 Bolt
B. 3/8-16 X 3-1/2 Bolt
C. 3/8-16 X 1-1/4 Bolt
D. 3/8” SAE Washer
E. 3/8-16 Nylon Flange Nut
F. Rear Bracket
B
A
C
F
E
E
D
D
Figure 7. C-Clamp Positions
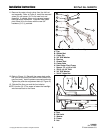
9. Snugly clamp the top of bracket and the bottom of
the new front end to the frame rail using (2) more C-
clamps. Tighten the bottom bracket bolts. Refer to
Figure 8. Using the front top hole as a guide drill a
3/8” hole through the frame and install 3/8-16 X 2-
1/2” bolts and 3/8-16 flange nuts on both sides of the
frame. Tighten the bracket hardware (Do Not
Exceeds 35 ft lbs of Torque) and remove clamps that
were holding it.
10. Drill the front mounting holes: Use the holes in the
new front end as guide, drill the top holes from the
top and the bottom holes from the bottom to insure
the correct alignment. Install 3/8-16 X 3-1/2” bolts
(A, Figure 6) and 3/8-16 flange nuts (E, Figure 6).
Tighten the hardware and remove the clamps.
Bottom of Frame
Top & Side
Figure 8. Drill 3/8” Holes
Drill Holes
Here
FRONT
FRONT