


16
Troubleshooting & Service
Adjusting the Cable
1. Remove the engine cover.
2. Locate and loosen the lower locknut securing the
auger control cable (shown in Figure 14).
3. To change the slack in the cable, turn the upper lock-
nut slightly just until the slack between the spring
and the exposed cable has been eliminated.
4. Tighten the lower locknut.
5. Test the units to make certain that the cable has
been adjusted properly.
Testing the Auger Control Cable
Start the snowthrower engine and pull back on auger
control to operate auger. Release auger control and
check to be sure auger stops turning.
If auger continues to turn after auger control is
released, cable is too tight and will have to be adjust-
ed to make it longer. Cable must be slightly slack
when auger control is released (away from handle).
CARBURETOR ADJUSTMENT
The carburetor is properly calibrated and preset at the
factory for efficient cold weather operation. There are no
adjustments.
AUGER CONTROL
CABLE ADJUSTMENT
The length of the auger control cable is adjustable.
However, it will seldom be necessary to change the
cable length since the operating tension on the drive belt
is maintained by the spring on the end of the cable.
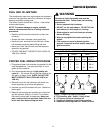
If the auger turns too slowly under heavy load or
momentary squealing of drive belt is heard when enter-
ing heavy snow, pressure applied to drive belt by idler
pulley must be increased by reducing the slack in the
cable.
If the auger continues to turn when the auger control
is released, the cable is too tight. The pressure applied
to the drive belt must be eliminated by increasing the
amount of slack to the cable adjustment.
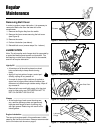
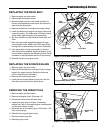
Figure 14. Auger Control Cable
Locknuts
Spring
Checking the Adjustment.
1. Remove the cover. (See page 14.)
2. Measure the spring while the auger control on the
handle is disengaged. Record this measurement.
3. Pull the auger control against the handle and again
measure the spring. Record this measurement.
4. Compare the two measurements. The measurement
obtained with the spring extended should be 7/16
inch (11 mm) greater than with the spring at rest.
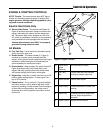
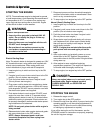
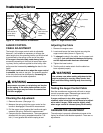
Figure 13. Cover Removal & Installation
Insert front
tabs first when
reinstalling
cover.
Align rear
tabs & side of
cover when
reinstalling.
Lift Cover
from Rear
of unit
Make certain the cable is not placing and tension
on the spring. If the cable places tension on the
spring, the auger may turn when the control has
not been engaged.
WARNING
Use extreme care when making adjustments that
require engine to be running. Keep hands, feet,
hair and loose fitting clothing away from moving
parts.
WARNING