


5
Assembling
the Snowthrower
TOOLS REQUIRED
• Socket or Wrench Set
• Pair of Pliers
ASSEMBLY PROCEDURE
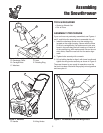
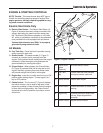
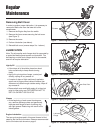
If your unit was not previously assembled, see Figures 1
and 2, and follow the steps below to assemble the unit:
1. Install the discharge chute on to the rotating ring
located on the auger housing. Secure with the three
5/16 inch carriage bolts, flat washers and nylok nuts
found in the parts bag (the bolt heads go to inside of
of the rotating ring, with washers and nuts on the out-
side). Note, install the rear bolt first for easier align-
ment.
2. Tighten bolts securely with a wrench.
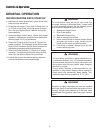
3. Lift up folding handle to align it with lower handle and
tighten the wing knobs securely as shown in Figure 3.
The snow thrower is now ready for operation once the
fuel tank has been filled with the properly mixed gasoline
and two cycle oil.
Figure 1. Assembly of Discharge Chute
A. Discharge Chute D. Nuts
B. Carriage Bolts E. Rotating Ring
C. Washers
A
B
C
D
E
Figure 2. Handles
A. Handle B. Wing Knobs
A
B
Figure 3. Lift Handles and Lock Wing Knobs