


20
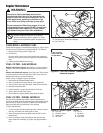
CHECKING / ADDING FUEL
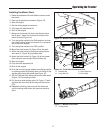
Check the fuel gauge on the dashboard display (A, Figure 19) to
be sure there is enough fuel to complete the job. To add fuel:
1. Remove the fuel cap (see B, Figure 19).
2. Fill the tank.
Do not overfill. Leave room in the tank for fuel expansion.
Refer to your engine manual for specific fuel recommenda-
tions.
3. Install and hand tighten the fuel cap.
FUEL FILTER - GAS MODELS
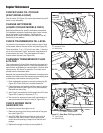
Models with Kohler engines: See Figure 21. The fuel filter is
located in the fuel line between the fuel tank and the carbure-
tor.
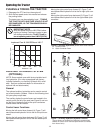
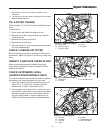
Models with Kawasaki engines: See Figure 20. The fuel filter
is located under the left rear seat deck, and is in the fuel line
between the fuel tank and the carburetor.
If filter is dirty or clogged, replace as follows:
1. Disconnect the negative battery cable.
2. Place a container below the filter to catch spilled fuel.
3. Using a pliers, open and slide hose clamps from fuel filter.
4. Remove hoses from filter.
5. Install new filter in proper flow direction in fuel line.
6. Secure fuel line with hose clamps.
7. Reconnect the negative battery cable when finished.
FUEL FILTER - DIESEL MODELS
The fuel filter assembly has a built in water separator that
should be drained when the indicator light in the dashboard dis-
play turns on or once per season. Replace the fuel filter ele-
ment every 800 hours of operation or as required.
To drain the fuel filter:
1. Turn the engine off, set the parking brake, remove the igni-
tion key, and wait for all moving part to stop.
2. Allow the engine and surrounding areas to cool to room
temperature.
3. Place a container under the fuel filter tube and turn the
base of the filter assembly (G, Figure 24) approximately 1
turn.
Regular Maintenance
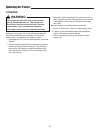
WARNING
Gasoline is highly flammable and must be
handled with care. Never fill the tank when the
engine is still hot from recent operation. Do not
allow open flame, smoking or matches in the
area. Avoid over-filling and wipe up any spills.
Do not remove fuel filter when engine is hot, as
spilled gasoline may ignite. DO NOT spread hose
clamps further than necessary. Ensure clamps
grip hoses firmly over filter after installation.
Do not use gasoline containing METHANOL,
gasohol containing more than 10% ethanol,
gasoline additives, premium gasoline, or white
gas because engine/fuel system damage could
result.
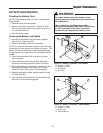
Figure 20. Fuel Filter Location - Models with
Kawasaki engines
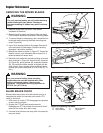
Figure 19. Fuel Tank Fill
A. Fuel Gauge on Dashboard Display
B. Fuel Tank Cap.
A
B
Filter Located
Under Left Side
of Seat Deck
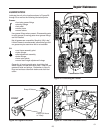
Figure 21. Kohler Engine - Typical
A. Oil Filter E. Oil Fill
B. Oil Drain Valve F. Dip Stick
C. Spark Plug G. Oil Cooler
D. Air Filter H. Fuel Filter
E
C
F
D
A
G
B
H