


13
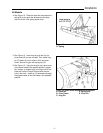
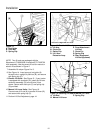
Removal
1.Lower the blade.
2.Remove blade and lift rod from push bar.
3.Raise push bar and unhook the spring from the
chain. Remove the chain from the frame bracket.
Reinstall safety clip to clevis pin.
4.Disconnect the lift rod from the lift lever on tractor
by removing the spring clip.
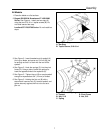
Set tractor speed to obtain the needed power to move
the material. Operate at a safe speed, depending on
conditions, so that you have complete control of the
tractor. Rear wheel weights and chains are recom-
mended for slippery surfaces.
A weight box is recommended for additional traction.
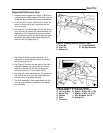
Operation On Slopes
Never operate on slopes greater than 30 percent
(16.7°) which is a rise of three feet (91 cm) in ten feet
(305 cm) forward. Use two rear wheel weights (one
per wheel) when operating on slopes greater than 20
percent (11.3°).
For additional traction, tire chains and a weight box
can be added. Maximum weight added to tractor
should not exceed 35 lbs. per wheel and 100 addition-
al lbs. in weight box.
Always operate up and down the face of slopes, and
never across the face. Use a slow ground speed on
slopes.
Normal Care
After dozing jobs, hose down the blade to remove
excess dirt. Coat bare metal surfaces to prevent rust-
ing. Lightly oil all pivot points.
If the wear plate on bottom of the blade is worn
excessively, replace it with a new one by removing
the six carriage bolts.
Operation & Normal Care
Transporting
For maximum ground clearance, transport the blade
to and from work areas fully raised and angled
straight ahead.
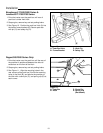
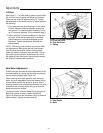
Dozing and Snow Plowing
When dozing, push the dirt to the desired location,
then drag the blade backwards for final leveling. Pack
down the dirt or gravel by driving the tractor over the
leveled area.
Use the grade of the area being plowed or dozed to
your advantage. Plow downhill and set the blade
angle so that plowed material (especially snow) is
moving downhill as it leaves the blade. To change
blade angle, pull out the blade pivot pin. Pivot the
blade to one of the other three holes and reinstall the
pivot pin.
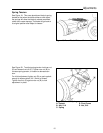
For large drifts of snow, plow narrower paths instead
of attempting to plow a full blade width.
WARNING
Be particularly careful and operate at low
tractor speeds in any area where the blade
can hook on solid objects. Such objects can
cause the tractor to be jarred or come to an
abrupt stop.
5.Remove the latch rod and spring clip securing
push bar to tractor frame brackets, or clevis pins
and spring clips securing push bar to hitch rail
extensions. Remove push bar.
6.Reinstall all pins (king pin, pivot pin, hitch pin) and
secure with spring clip or safety clip for storage.