


Operation
15
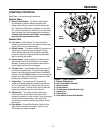
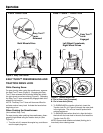
GROUND SPEED SELECTOR
Use the speed selector (A, Figure 2) to control the drive
speed of the snowthrower. There are five forward speeds
and two reverse speeds.
Use the lower speeds to blow deep or wet snow. Use the
higher speeds to blow light snow or to drive the snow-
thrower without blowing snow.
To change speeds, release the auger control lever (B,
Figure 2), then move the speed selector to the desired
setting. Fully depress the control levers to resume.
ENGINE SPEED
Always run the snowthrower at full throttle.
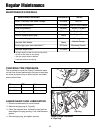
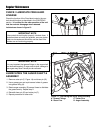
DEFLECTOR
The distance of the discharged snow is mainly controlled
by the position of the deflector. (Engine speed also
affects distance of discharge.) The more the deflector is
tilted UP, the farther snow will be thrown.
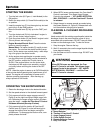
1. Push the remote deflector control (C) to the left to
UNLOCK the control. Sliding the contort forward(B)
will put the deflector to the maximum throwing posi-
tion (A). Sliding the control backwards to decrease
the throwing distance.
2. Release the control to LOCK in place when the
desired angle has been chosen.
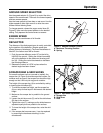
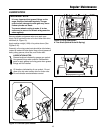
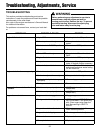
SCRAPER BAR & SKID SHOES
On smooth surfaces such as concrete or asphalt, the
scraper bar (A, Figure 4) should scrape the surface. On
surfaces such as gravel, the scraper bar should be high
enough so that it will not pick up gravel or debris.
The height of the scraper bar (A) is controlled by raising
or lowering the skid shoes (B).
1. To raise the scraper bar height, rest the scraper bar
(A) on a strip of wood equal in thickness to the desired
height.
2. Make sure the scraper bar is parallel to the ground
surface.
3. Loosen the skid shoe nuts (C) and let the skid shoes
(B) drop to the surface.
4. Tighten the nuts (C), making sure the skid shoes are
adjusted equally and are parallel to the surface.
5. To lower the height of the scraper bar, raise the skid
shoes.
6. If the scraper bar becomes worn, it can be replaced
by removing the hardware attaching it to the
snowthrower.
Figure 3. Remote Deflector Control
A. Maximum Throwing Position
B. Spring
A
B
Figure 4. Skid Shoe Adjustment
A. Scraper Bar
B. Skid Shoe
C. Nuts
A
B
C