


-8- Shop Fox
®
Classic Fence
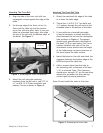
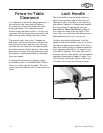
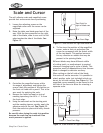
Figure 5. Rear rail pad location.
Rear Rail
Support Pad
Fence Shown Upside Down
Fence
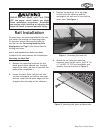
1. Raise the lock handle up to release the
fence locking tab and place the fence down
on the rails.
2. Make sure the angle bracket of the fence
assembly fits easily into the slot created by
the front rail bracket and rectangular tube.
• If any binding is experienced, loosen the
rail mounting bolts and adjust the rails.
3. Install the fence, and check to see that
it slides smoothly along the rails without
binding or catching on the table surface.
• If any binding is experienced, loosen the
rail mounting bolts and adjust the rails.
4. Make sure you keep the rail support pad free
of debris and dirt. This pad is pre-positioned
so that it slides along the top of the rail or
the top of the table. The rear rail support
pad is located on the underside of the fence.
See Figure 5.
7-Foot Rails
The W2006/2007 extended 7' rail set for the
SHOP FOX
®
Classic Fence increases the rip
capacity to the right of the blade to 54''.
These are mounted in the same manner as the
standard rails. The long rail set also includes
legs which provide added stability for the table
saw/fence assembly when large or heavy work
is positioned on the table.
Mounting the extension legs
1. Attach rails according to the rail installation
instructions on page 6
& 7.
2. Thread a
1
⁄2" hex nut onto each foot and
thread a foot into the bottom of each leg.
3. Loosely bolt a brace to each of the legs
with a
3
⁄8-16 x
3
⁄4" hex bolt and three
3
⁄8"
washers. Place two of the washers between
the leg and the brace.
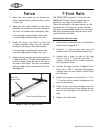
4. Position the legs as shown in Figure 6 and
insert two
1
⁄4-20 x
1
⁄2" hex bolts with washers
through each rail and loosely thread them
into the legs.
5. Rotate the braces up and thread a
3
⁄8-16 x
5
⁄8" hex bolt with a washer through each rail
and into the braces.
6. Place a level on the rails and adjust the feet
until the rails are level, then tighten the hex
nuts on the feet against the bottom of the
legs.
7. Tighten all of the bolts.