


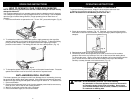
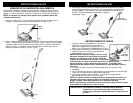

TO MAXIMIZE THE LIFE OF YOUR NI-CD BATTERIES
1. Charge for a minimum of 20 hours before initial use. Failure to do so will reduce
the product’s battery life significantly.
2. Do not store the unit with the charging adaptor attached and plugged in.
3. Only recharge when the batteries are fully discharged (or as close to fully
discharged as possible).
4. Do not store in areas of high temperature or humidity.
5. After three (3) months of storage, the product should be fully discharged and then
recharged to maximize battery power.
6. Use only the charger supplied with the product. If other chargers are used, the
batteries can fail causing damage to the battery, product or personal property.
7. Ni-Cd batteries have a long useful life but at some time they will need to be
replaced. To purchase replacement batteries and parts call Customer service at
1 (800) 798-7398.
NOTE: If the product has never been used or has been stored for an extended
period of time without use – it will take several complete charge and discharge
cycles to realize the full operational time of your product.
5
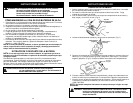
OPERATING INSTRUCTIONS
BATTERY REMOVAL & DISPOSAL
NOTE: If uncertain as to how to remove your battery pack, we suggest you take
your sweeper to a reputable small appliance service technician to have this
service performed.
This sweeper is equipped with Ni-Cd batteries and you need to dispose of them properly.
When the batteries are no longer good for use, they must be removed from the sweeper
for disposal. Do not remove the batteries for any reason other than disposal of them.
Call your nearest recycling center for information on the recycling and disposal of
Ni-Cd batteries.
WARNING: You must never use ordinary batteries for replacement
as these may leak and cause damage. Use only battery
pack XBP610N provided for replacement.
CAUTION: Do not attempt to remove the battery pack from the unit to
charge it.
Never attempt to throw the battery pack or unit into a fire or
incinerate it.
Do not attempt to remove or damage the battery casing.
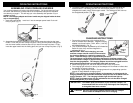
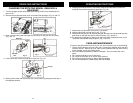
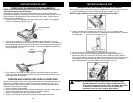
Removal of Battery Pack
1. Remove the dust cup container to ensure that no dust or dirt can fall out of the unit
while you are removing the battery.
2. Turn unit over so that the base is facing upwards. Be careful not to turn the unit “On”.
3. With a screwdiver, remove the screw securing the battery pack compartment cover to
the unit and set the cover and screw aside. (Fig. 6)
OPERATING INSTRUCTIONS
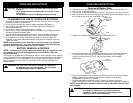
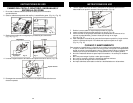
Positive Lead
(Red)
Negative Lead
(Black)
Fig. 7
6
Fig. 6
Screw
Battery Pack
Compartment
Cover
Negative
Connector
Positive
Connector
Fig. 8
4. Carefully lift out battery pack and disconnect the terminals. (Fig. 7)
5. Connect the terminals to the new battery pack taking care to connect the red lead
(+) to the positive (wider) connector first and the black lead (-) to the negative
(smaller) connector second. (Fig. 8) Place the new battery into the battery
compartment.
6. Place the new battery inside the battery compartment and tuck the wiring inside the
battery compartment so that the wiring does not interfere with the battery
compartment cover when it is replaced.
7. Re-install the battery compartment cover. Please call customer service at
1(800) 798-7398 if you have any questions about removing or replacing the batteries.
NOTE: Do not attempt to replace the batteries used in this product with any other
type of battery.
CAUTION: This appliance contains Ni-Cd batteries. The batteries must
be recycled or disposed of in accordance with local
regulations. Please consult your Yellow Pages or local
recycling center for more information.