


HOW1'0 USEYOURMOWER(CONT'O)
TO START ENGINE (CONT'D)
NOTE: In cooler weather the need to repeat prim_
ing procedures may be necessary, when weather
is warmer over priming may result in flooding.
If you do flood engine wait a few minutes before
repeating priming procedures_
It is not normally necessary to use the primer to
start warm engine°
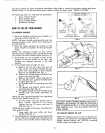
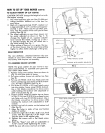
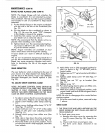
5. Position yourself as shown in Fig_ 15_
6. Pull on starter handle quickly°
7_ DO NOT allow starter rope to snap back°
8. To stop the engine, release the control bar
(See Fig. 14).
IF ENGINE DOES NOT START
1. Check blade - remove spark plug wire when
checking blade. If blade is loose, see "BLADE
AND BLADE FLANGE CARE" of manual for in*
structions on tightening blade.
2. Check air filter - replace if clogged_ See "Air
Filter" section.
3_ Check spark plug - if dirty, clean or replace_
4_ Observe that lower end of the engine control
cable is actuating the lever mounted on the
engineL
5. Engine may be flooded - wait a few minutes
and repeat starting procedure.
NOTE: If then your engine will not start, contact
your nearest Sears Service Department for' help.
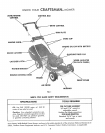
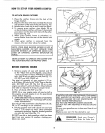
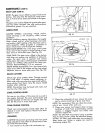
ZONE/ENGINE CONTROL
Your mower is equipped with a zone/engine con-
trol attached arrd requires no adjustments (See
Fig_ 13).
DRIVE CONTROL
The power-propelling forward motion is con-
trolled by pulling the control bar down to handle
and pushing control forward to engage position
(See Fig. 13).
Forward motion will stop when the control bar
is released.
To stop forward motion without stopping the
engine, release the control bar slightly until the
drive control disengages. Depress control bar to
handle to continue mowing without self-propel-
ling.
To turn corners, you may prefer to keep the drive
control engaged, and push down on the handle,
lifting the front wheels off the ground and turin
ing mower'.
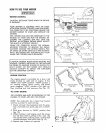
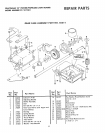
POWER-PROPELLED DRIVE
1. Your power-propelled drive is accomplished
by a belt drive from the engine crankshaft to
a worm gear case.
2_ The drive belt is spring-loaded at the gear case
to maintain proper belt tension. Keep the area
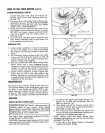
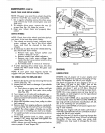
SCREWS
FIG_ 16
JAM NUT"D" JAM NUT "C"
FIG 17
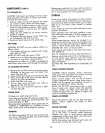
BLOCK OF WOOD
FIG_ 18
FIG 19
lo