


Jl
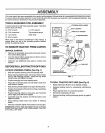
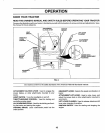
HOW TO SET UP ",/'OURTRACTOR
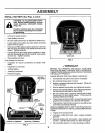
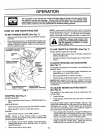
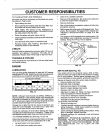
PREPARE BATTERY (See Fig. 2)
....... ,,,,, ,,,,,,,,, ,,,,,,
CAUTION: Wear eye and face shield.
Wash hands or clothing immediately if
& acciden_Uyin contact with battew acid.
Do not smoke. Fumes from charged
battery acid are explosive.
Read the instructions included with the
battery vent caps. Always wear gloves,
clothing and goggles to protect your
hands, skin and eyes.
Your tractor' has a battery charging system which is
sufficientfor normat use+However, periodicchargingofthe
battery with an automotive charger willextend its life.
• See instructions packed with vent caps in parts bag.
° Fill battery with acid. Fill each cell until it reaches the
bottom of the vent wells. Do not overfill.
• Allow battery to stand and settle for at least thirty
minutes. After standing, check the battery cell acid
level+ If below the vent wells, add more acid until the
correct tevei is reached+
While battery is standing (after adding acid) and later, while
battery is being charged, continue with assembly of tractor+
IMPORTANT: TO MAXIMIZE THE LIFE OF YOUR
BATTERY, IT tS NECESSARY THAT THE BATTERY BE
CHARGED BEFORE USE. FAILURE TO CHARGE
BATTERY CAN RESULT IN A SHORTENED BATTERY
LIFE.
• Charge battery at a rate of 6 amperes for1 hour,. Use
a 12 volt battery charger. Observe all safety precau-
tions required for battery charging+
• Check the acid level after the battery is charged. If the
acid has fallen below the correct level, add distilled or
ironfree water+
. Install the vent caps to cover the vent wells+ Wash the
top of the batter] with water to remove any acid, then
wipe dry+
° Check battery case for' leakage to make sure that no
damage has occurred in harldUng+
• Dispose of excess battery acid. Neutralize acid for
disposal by adding it to two gallons of water in a five
gal!on plastic container. Stir with a wooden or plastic
paddle while adding baking soda until the addition of
more soda causes no more foaming,
• Follow instructions on how to install battery.
CUT AWAY VIEW
BATTERY
CELL ACID
LEVEL
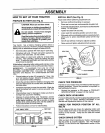
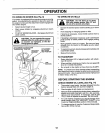
INSTALL SEAT (See Fig. 3)
Adjust seat before tighteningadjustment bolt,
• Remove cardboard packing on seat pan+
• Place seat on seat pan and assemble shoulder boll
o Assemble adjustment bolt, iockwasherand flatwasher
loosely,. Do not tighten+
• Tighten'shoulder bolt securely+
° Lower seat into operating position and sit on seat.
• Slide seat until a comfortable position is reached which
allows you to press clutch/brake pedal all the way
down.
• Get off seat without moving its adjusted position.
• Raise seat and tighten adjustment bolt securely.
SEATPAN
SHOULDER \_\
BOLT
ADJUSTMENT
BOLT
LOCK WASHER
FIG. 3
CHECK TIRE PRESSURE
The tiresonyourtractor wereovednflated at the factory for+
shipping purposes. Correct tire pressure is important for
best cutting performance.
• Reduce tire pressure to PSI shown in "PRODUCT
SPECIFICATIONS" on page 3 of this manual.
CHECK DECK LEVELNESS
For best cuttingresults, mower housing should be properly
leveled+ See 'q'O LEVEL MOWER HOUSING" in the
Service and Adjustments section of this manual.
CHECK FOR PROPER POSITION OF ALL
BELTS
See the figures that are shown for replacing motion and
mower blade drive belts in the Service and Adjustments
section of this manual Verify that the belts are routed
correctly
CHECK BRAKE SYSTEM
After you learn how to operate your tractor, check to see
that the brake is properly adjusted. See "TO ADJUST
BRAKE" in the Service and Adjustments section of this
manual.,
RG. 2 8