


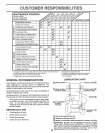


CUSTOM RESPONSIBIL ES
TRACTOR
Always observe safety rules when performing any mainte-
nance.
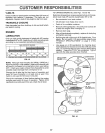
BRAKE OPERATION
If tractor requires more than six (6) feet stopping distance
at high speed inhighest gear, then brake must be adjusted.
(See 'q'O ADJUST BRAKE" in the Service and Adjust-
ments section of this manual)_
TIRES
o Maintain proper air pressure in all tires (See "PROD-
UCT SPECIFICATIONS on page 3 of this manual)°
o Keep tires free of gasoline, oil, or insect control chemi-
cals which can harm rubber°
,, Avoid stumps, stones, deep ruts, sharp objects and
other' hazards that may cause tire damage.
BLADE CARE
For best results mower blades must be kept sharp° Re-
place bent or damaged blade&
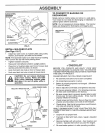
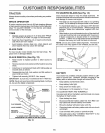
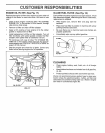
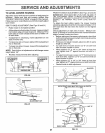
BLADE REMOVAL (See Fig. 13)
= Raise mower to highest position to allow access to
bladeso
o Remove hex bolt, Iockwasher and flat washer securing
blade°
o install new or resharpened blade with trailing edge up
towards deck as shown°
o Reassemble hex bolt, lock washer and flat washer in
exact order' as shown°
o Tighten bolt securely (30-35 Ft. Lbs. torque)°
IMPORTANT: BLADE BOLT IS GRADE 8 HEATTREATED.
NOTE: We do not recommend sharpening blade- but ifyou
do, be sure the blade is balanced.
BLADE
FLA
LOCI{ WASHER .,,_
HEX BOLT
(GRADE 8)*
I TRAILING EDGE
*A GRADE 8 HEAT TREATED BOLT CAN BE
IDENTIFIED BY SIX LINES ON THE BOLT HEAD,
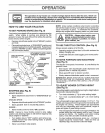
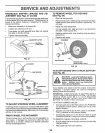
TO SHARPEN BLADE (See Fig. 14)
Care should be taken to keep the blade balanced. An
unbalanced blade will cause excessive vibration and even-
tual damage to mower and engine.
= The blade can be sharpened with a file or on a grinding
wheel° Do not attempt to sharpen while on the mower..
= To check blade bafance, you will need a 5/8" diameter
steel bolt, pin, or a cone batancer, (When using a cone
batancer, follow the instructions supplied with bat-
ancer).
o Slide blade on to an unth readed portion of the steel bolt
or pin and hold the bolt or pin parallel with the ground.
If blade is balanced, it should remain in a horizontal
position. If either end of the blade moves downward,
sharpen the heavy end until the blade is balanced°
NOTE: Do not use a nail for balancing blade.. The lobes of
the center hole may appear to be centered, but are not.
CENTER HOLE / /
FIG. 14
BATTERY
Your tractor has a battery charging system which is suffi-
cient for normal use,, However, periodic charging of the
battery with an automotive charger will extend its _ife.
o Keep battery and terminals clean.
= Keep battery botts tight°
• Keep small vent holes open.
o Recharge at 6-10 amperes for 1 hour.
TO CLEAN BATTERY AND TERMINALS
Corrosion and dirt on the battery and terminals can cause
the battery to "leak" power..
° Open battery box door.
Disconnect BLACK battery cable first then RED bat-
tery cable and remove battery from tractor.
° Rinse the battery with plain water and dry.,
o Clean terminals and battery cable ends with wire brush
until bright.
o Coat terminals with grease or petroleum jelly°
. Reinstall battery (See "CONNECT BATTERY" in the
Assembly section of this manual).
FIG. 13
!6