


-- 7 --
As your unit is used, carbondeposits build up
on the muf fler and spark arresting screen.
For normal homeowner use, however, the
muffler andspark arrestingscreen will notre-
quire any service. After 50 hours of use, we
recommend that your muf fler be serviced or
replaced by your authorized service dealer.
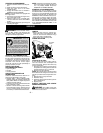
CARBURETOR ADJUSTMENT
W ARNING:
Keep others away when
making idle speed adjustments. The blade
will be moving during most of this procedure.
Wear your protective equi pmentand observe
all safety precautions. When making adjust-
ments, use a screwdriver short enough to
keep your hands behind the handguard and
away from the blade. After making adjust-
ments, theblademustnotmoveat idle speed.
The carburetor has been carefully set at the
factory. Adjustments may benecessary ifyou
notice any of the following conditions:
S
Engine will not idle when the throttle is re-
leased.
S
The blade moves at idle.
Keep others away when making idle speed
adjustments. Make adjustments with the unit
resting on a leve l surface free of debris that can
be cau ght in the hedge trimmer blade. Serious
injury to the operator and others can occur if the
carburetor is not prop erly adjusted. Keep all
parts of your body away from the blade and
muffler.
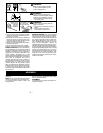
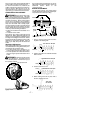
Idle Speed Adjustment
Allow engineto idle. Adjust speeduntilengine
runswithoutblademoving (idletoofast) oren-
gine stalling (idle speed too slow).
S
Turn idle speed screw clockwise to in-
crease enginespeedif enginestalls ordies.
S
Turn idle speed screw counterclockwise to
decrease engine speed if the blade moves
at idle.
W ARNING:
Recheck the idle speed
after each adjustment. The blade must not
move at idle speed to avoid serious injury to
the operator or others.
Idle Speed Screw
Ifyourequirefurtherassistanceor areunsure
about performing this procedure, contact an
authorized service dealer or call
1--800--554--6723.
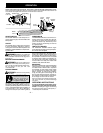
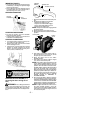
BLADE ADJUSTMENT
The clearance between the cutting blades
must beadjustedperiodically tomaintain opti-
mal performance and sharp cutting.
Blade
guide
Bolt
Blades
Cupped
Washer
Flat
Washer
Blade guide
Nuts
Nut
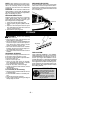
1. Using a wrench, loosen each nut on the
top side of the blade guide.
Wrench
Nut
TOP SIDE OF BLADE
2. Tighten each bolt from underside of blade
with a wrench.
UNDERSIDE OF BLADE
Bolt
3. Loosen each bolt 1/2 turn.
UNDERSIDE OF BLADE
Bolt
1/2 turn
4. While holding each bolt in place with a
wrench, retighten the nuts.
TOP SIDE
OF BLADE