


24
R
Section 6
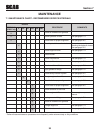
CUTTER DECK ADJUSTMENT
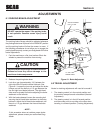
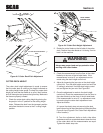
BOLT
CUTTER DECK ADJUSTMENT
BOLT
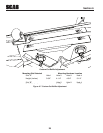
Cutter Deck Pitch AdjustmentFigure 6-5.
CUTTER DECK HEIGHT
The cutter deck height adjustment is made to ensure
that the cutter deck is cutting at the height indicated on
the cutting height index gauge. To check for proper deck
height, be sure that the mower is on a flat, level surface,
shut off the engine and remove the igition key. Make sure
the tires are properly inflated.
Check the cutter deck cutting height by placing the 1.
lanyard pin in the 3" position on the cutting height
index. Release the deck from the transport position
and allow the deck to move to the 3" cutting height
position.
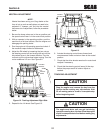
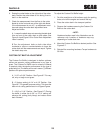
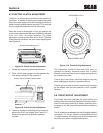
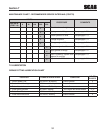
DECK HEIGHT
CONTROL ROD
LOOSEN HERE
Cutter Deck Height AdjustmentFigure 6-6.
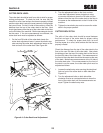
Rotate the cutter blade on the left side of the cutter 2.
deck. Position the cutter blade so it is facing "front to
back" on the machine.
WARNING
Always wear proper hand and eye protection when
working with cutter blades.
Check the measurement from the floor to the cutter 3.
blade tip at the rear of the left side blade. If the
measurement is not at 3", an adjustment can be
made using the deck height control rod.
Adjust by loosening the jam nuts on the deck height 4.
control rod. Turn the deck height control rod until the
3" setting is acheived. Hold the deck height control
rod and tighten the jam nuts. See Figure 6-6.
Once the adjustment is made to the deck height 5.
control rod, Check the measurement from the floor to
the cutter blade tip at the front of the left side blade.
If the measurement is not at 3", an adjustment must
be made using the cutter deck adjustment lever.
Adjust as follows:
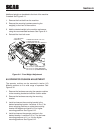
A. Loosen the elastic stop nuts securing the deck
level links on front of the cutter deck on both sides (See
Figure 6-4 and Figure 6-5 for Cutter Deck Adjustment
Lever Location).
B. Turn the adjustment bolts on both side either
clockwise to raise or counterclockwise to lower the front
of the cutter deck until the measurements are equal.
Tighten the elastic stop nuts.