


11
ASSEMBLY
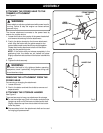
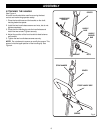
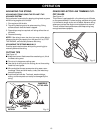
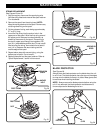
BLADE
GUARD
BLADE
CUPPED
WASHER
BLADE NUT
HOLDING PIN
Fig. 10
WRENCH
(13 mm)
UPPER FLANGE
WASHER
INSTALLING THE BLADE
See Figure 10.
1. Place the upper flange washer over the gear shaft with
the hollow side toward the blade guard.
2. Center the blade on the upper flange, making sure the
blade sits flat. Install the cupped washer with the raised
center away from the blade. Install the blade nut. The
blade turns counterclockwise from the operator’s posi-
tion.
3. Place the holding pin through the slot in the upper flange
washer and the hole in the gear head. Using the 13 mm
(1/2 in.) wrench supplied, turn the blade nut counter-
clockwise.
4. Tighten nut securely.
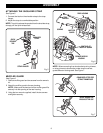
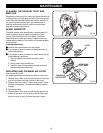
CONVERTING FROM BRUSHCUTTER TO
STRING TRIMMER
REMOVING THE BLADE
See Figure 10.
1. Place the holding pin through the slot in the upper flange
washer and the gear head. Turn the blade nut clockwise
to remove.
2. Remove the cupped washer and the blade.
3. Remove the upper flange washer from the gear shaft and
retain for the string head installation.
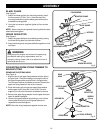
4. Attach the grass deflector to the blade guard by placing
the three locking tabs into the three notches.
5. Snap the blade guard and grass deflector together to
lock into place.
NOTE: Store the brushcutter parts together for later use.
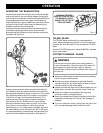
INSTALLING THE STRING HEAD
See Figure 9.
1. Install the upper flange washer onto the gear shaft with
the hollow side toward the gear head.
2. Place the holding pin through the slot in the upper flange
washer and the hole in the gear head. Using the 16 mm
(5/8 in.) wrench supplied, turn the drive connector
counterclockwise to install. Tighten securely.
3. Place the string head on the drive connector.
4. Place the holding pin through the slot in the upper flange
washer and the hole in the gear head. Install the spool
retainer and turn counterclockwise to tighten securely.
GEAR
HEAD