


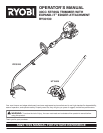


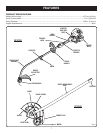


9
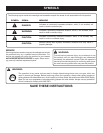
INSTALLING AN ATTACHMENT TO THE
POWER HEAD
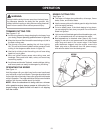
See Figure 2.
WARNING:
Never install, remove, or adjust any attachment while
power head is running. Failure to stop the engine can
cause serious personal injury.
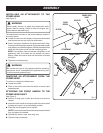
The attachments connect to the power head by means of
a coupler device.
Loosen the knob on the coupler of the power head shaft
and remove the end cap from the attachment.
Push in the button located on the attachment shaft. Align
the button with the guide recess on the power head coupler
and slide the two shafts together. Rotate the attachment
shaft until the button locks into the positioning hole.
NOTE: If the button does not release completely in the
positioning hole, the shafts are not locked into place.
Slightly rotate from side to side until the button is locked
into place.
Tighten the knob securely.
WARNING:
Be certain the knob is fully tightened before operating
equipment; check it periodically for tightness during use
to avoid serious personal injury.
REMOVING AN ATTACHMENT FROM THE
POWER HEAD
To remove or change the attachment:
Loosen the knob.
Push in the button and twist the shafts to remove and
separate ends.
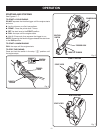
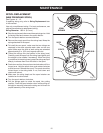
ATTACHING THE FRONT HANDLE TO THE
POWER HEAD SHAFT
See Figure 3.
Remove 2 wing nuts, 2 bolts, and clamp from the front
handle.�
Install the front handle onto the top side of the drive shaft
housing and move it to a comfortable position.
Place the bolt through the front handle.
NOTE: The hex bolt head fits inside the hex recess molded
into one side of the handle.
Reinstall the clamp, bolts, and wing nuts.
Tighten wing nut securely.
ASSEMBLY
Fig. 2
COUPLER
KNOB
ATTACHMENT
POWER HEAD
SHAFT
POSITIONING
HOLE
GUIDE
RECESS
BUTTON
WING
NUT
FRONT HANDLE
BOLT
Fig. 3
CLAMP