


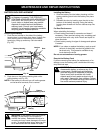
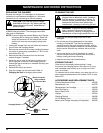

3. While firmly holding the lower wire housing, push it
straight into the coupler until release button clicks
into place (Fig. 7).
4. Turn the knob clockwise to tighten (Fig. 7). Do not
over tighten.
CAUTION: Lock the release button in the
release button hole and securely tighten the
knob before operating this unit.
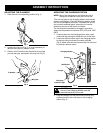
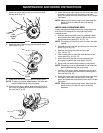
2. Press and hold the release button (Fig. 6).
3. While firmly holding the coupler housing, pull the
cutting attachment or blower attachment straight out
of the coupler (Fig. 6).
Installing Add-On Attachments:
1. Turn knob counterclockwise to loosen (Fig.6).
2. Align the groove on the lower wire housing of the
attachment with the ridge on the coupler (Fig. 7).
CAUTION: Do not force attachment. To
prevent damage to the attachment or
coupler, ensure alignment is made before
installing add-on attachment.
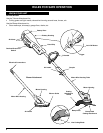
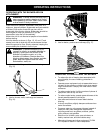
OPERATING INSTRUCTIONS
9
OPERATING THE COUPLER
The coupler enables the use of both trimmer and blower.
Removing Add-On Attachments:
WARNING: Battery tools do not have to be
plugged into an electrical outlet; therefore,
they are always in operating condition. To
prevent serious personal injury, take extra
precaution and care when removing or
installing add-on attachments.
1. Turn the knob counterclockwise to loosen (Fig. 6).
NOTE: To make installing or removing the add-on
attachment easier, place the unit on the ground
or on a work bench.
Release Button
Guide Recess
Knob
Knob
Ridge
Tighten
Groove
Large
Connection
Release
Button Hole
Upper Wire
Housing
Coupler
Coupler
Fig. 6
Lower Wire
Housing
Lower Wire
Housing
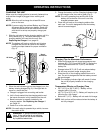
HANGER
A plastic hanger (Fig. 8) comes attached to the end of
the blower shaft housing. Install the hanger on the
cutting attachment or blower attachment to help in
storing out of the way when not in use.
• Push the release button on the motor wire housing
and pull the hanger to remove.
• Align the hole in the hanger with the release button
on the motor wire housing and press to install.
Fig. 8
Fig. 7
Electrical Connections