


11
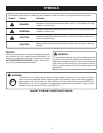
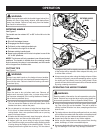
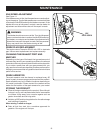
Fig. 7
GEaR boX
coVER
scREws
GEaR boX
coVER
bladE
scREws
busHInG
GEaR
MAINTENANCE
WARNING:
When servicing, use only identical replacement parts.
Use of any other parts may create a hazard or cause
product damage.
WARNING:
Always wear safety goggles or safety glasses with side
shields during product operation. If operation is dusty,
also wear a dust mask.
WARNING:
Before inspecting, cleaning, or servicing the machine,
shut off engine, wait for all moving parts to stop, and
disconnect spark plug wire and move it away from spark
plug. Failure to follow these instructions can result in
serious personal injury or property damage.
GENERAL MAINTENANCE
Avoid using solvents when cleaning plastic parts. Most
plastics are susceptible to damage from various types of
commercial solvents and may be damaged by their use. Use
clean cloths to remove dirt, dust, lubricant, grease, etc.
WARNING:
Do not at any time let brake fluids, gasoline, petroleum-
based products, penetrating lubricants, etc., come in con-
tact with plastic parts. Chemicals can damage, weaken or
destroy plastic which may result in serious personal
injury.
Only the parts shown on the parts list are intended to be
repaired or replaced by the customer. All other parts should
be replaced at an Authorized Service Center.
WARNING:
Blades are sharp. When handling the blade assembly,
wear non-slip, heavy-duty protective gloves. Do not place
your hand or fingers between blades or in any position
where they could get pinched or cut. NEVER touch blades
or service unit with the spark plug wire connected.
REPLACING BLADES
See Figure 7.
Periodically inspect the blades for damage and wear. Always
use the manufacturer’s specified replacement blades.
Stop the engine and disconnect the spark plug wire.
Place the hedge trimmer upside down on a workbench
and remove the gear box cover screws.
Remove the gear box cover and set aside.
Remove the blade screws.
Remove the old blade.
Install the new blade and reinstall blade screws to
secure.
Install the gear box cover and reinstall gear box cover
screws to secure.