


Page 1
1. BEFORE OPERATING
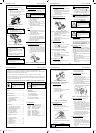
1.1 Grass Catcher Assembly (Refer Fig. 1)
1. Position the catcher top over the catcher
bottom.
2. Align the barbs on the catcher top with
the slots in the catcher bottom.
3. Press firmly down on the catcher top to
lock the barbs into the slots.
Figure 1 - Grass Catcher Assembly
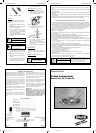
Figure 2 - Handle Bar Adjustment
1.3 Handle Bar Height Adjustment (Refer Fig 2)
1.Loosen the two bolts (C) at the base
of the handle bars on both sides using
a 1/2" AF spanner.
C
• Lift the Locking Lever to release the
handle bars for folding.
• Push the Locking Lever closed to
lock the handle bars in the operating
position.
• Adjust the tension by turning the lock
nut with a 1/2" AF spanner.
B
2. Move the handle bars to the required
position and tighten the handle bar bolts.
1.4 Engine Lubrication
Check the engine oil level before starting. (Refer
to the Engine Manufacturer’s Instructions)
1. Position the mower on a level surface and
clean around the dipstick.
2. Remove dipstick.
3. Insert a clean funnel.
4. Slowly add oil (Refer to the Engine
Manufacturer’s Instructions).
5. Check oil level. Refer to Engine
manufacturers instructions.
6. Replace the dipstick when the oil level is
correct.
1.5 Fuel
(Check the Engine Manufacturer’s Instructions)
1. Position the mower on a level surface in
a well ventilated area.
2. Clean around the fuel tank cap.
3. Remove the fuel tank cap.
4. Place a clean funnel in the fuel filler.
5. Fill the fuel tank with unleaded petrol,
allowing room in tank for fuel expansion.
6. Replace the fuel tank cap.
7. Clean up any spilt fuel.
2. OPERATION
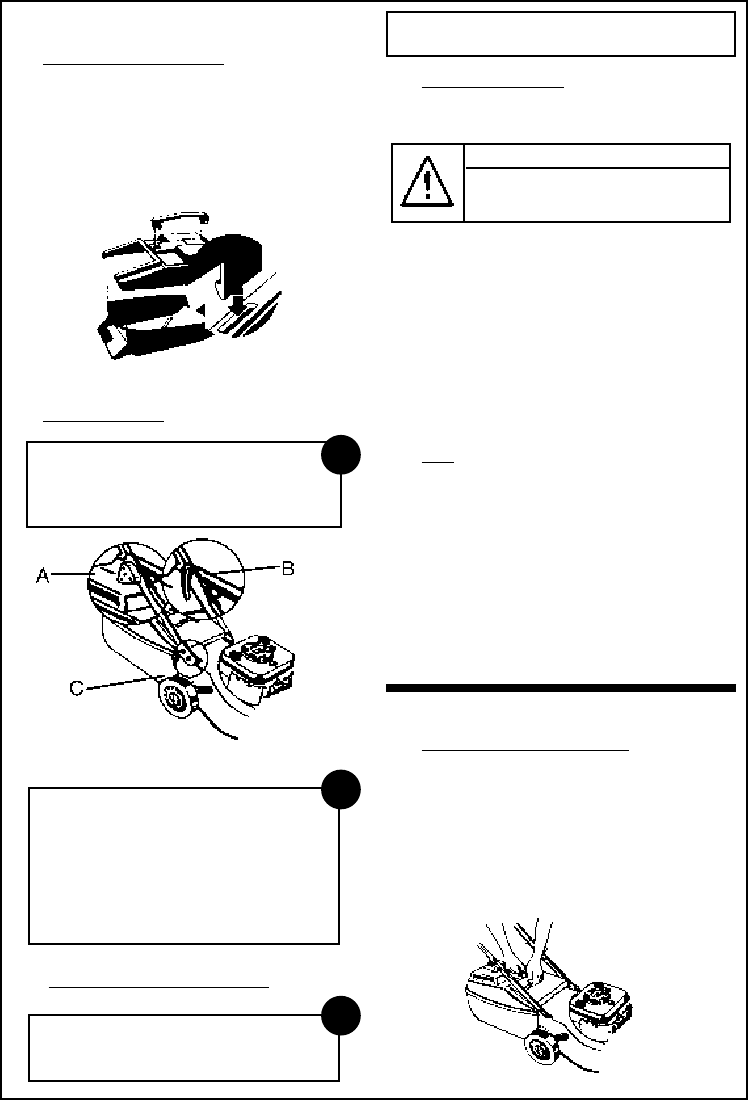
2.1 Installing the Grass Catcher (Refer Fig. 3)
1. Raise the rear flap of the mower.
2. Grasp the grass catcher by the top handle,
insert into the opening and position it
against the rear of the mower as shown.
3. Lower the rear flap so that the back edge
of the flap hooks over the lip of the grass
catcher.
Figure 3 - Installing & Removing Grass Catcher
CAUTION
To avoid premature engine failure use
a clean funnel. Clean oil filler hole.
1.2 Folding Handles (Refer Fig. 2)
• Turn the Locking Knobs to lock or
release the handle in either:
- the operating position or;
- the folded position for storage
A
Rover Mowers Limited Rotary Lawnmower
2.6 Self-Propelled Mowers - Engaging the
Drive
1. Start the engine and move the throttle
control to the FAST position.
2. Push slowly forward on the clutch
engagement lever to engage the self-
propelled drive to the rear wheels.
2.7 Self-Propelled Mowers - Disengaging the
Drive
1. Release the clutch engagement lever.
2. Allow the clutch engagement lever to
return to the disengaged position.
3. MAINTENANCE - General
3.1 Engine Air Cleaner
(Refer to the Engine Manufacturer’s Instructions
for detailed cleaning instructions)
The engine air cleaner element must be serviced
after each 25 hours of normal mowing. The
element must be serviced more regularly if the
mower is used in dusty conditions.
3.2 Snorkel Air Cleaner (Refer Fig. 5)
Where Fitted
The snorkel air cleaner element must be
serviced after each 50 hours of normal
mowing. The element must be serviced
more regularly if the mower is used in dusty
conditions. Replace immediately if the element
is damaged.
1. Disconnect the air tube from the element
holder.
2. Remove the holder cap.
3. Remove the cartridge and tap gently on a
flat surface to remove dirt.
4. Replace element in holder and replace
holder cap.
5. Replace the air tube to the bottom of the
element holder.
Page 2
2.2 Removing the Grass Catcher (Refer Fig 3.)
1. Grasp the grass catcher by the top handle
and lift up.
2. Raise the rear flap of the mower while
lifting the grass catcher (this will release
the grass catcher).
3. Lift the grass catcher clear of the mower.
4. Lower the rear flap.
2.3 Adjusting the Height of the Cut
(Refer Fig. 4)
1. Grasp the Cut Height Lever. (A)
Figure 4 - Adjusting the Height of the Cut
2. Apply an outward pressure to release the
Cut Height Lever from the rack.
3. Hold the lever out.
4. Move the lever up or down the rack for
suitable height of cut.
5. Engage the lever in the adjustment rack.
6. Release the lever.
2.4 To Start the Engine
ENGINE WITH PRIMER BULB
1. Move the throttle control to FAST
position.
2. Prime engine as per engine manual.
3. Grasp the starter handle and pull.
ENGINE WITH MANUAL CHOKE
1. Turn fuel tap ON. (where fitted).
2. Move throttle control to CHOKE
position.
3. Grasp starter handle and pull.
4. After engine starts move throttle control
to FAST position.
2.5 To Stop the Engine
1. Move the Throttle Control lever to the
STOP position.
CAUTION
To avoid excessive clutch wear.
Do not hold the engagement lever
in a semi-engaged position to slip
the clutch.
CAUTION
• Do not allow dirt to enter the air
tube, engine damage may occur.
• Check the condition of the air
tube regularly and replace if
damaged.
Rover Mowers Limited Rotary Lawnmower
PREFACE
Congratulations on your purchase of a quality Rover Product, Australian made and owned.
This manual covers the operation and maintenance of the Rover walk behind mower. Please read and
understand this owner’s manual before using the mower.
If any point is unclear. Contact Rover Mowers Limited, or any Rover Mower Service Dealer.
Rover Mowers Limited reserves the right to make changes and add improvements to its products at any
time, without notice or obligation. The Company also reserves the right to discontinue manufacture of
any product at its discretion at any time.
To emphasise special information the following WARNING and CAUTION highlights are used.
WARNING
The safety of the user and others
involved. Personal injury may
result should this information be
disregarded.
CAUTION
Follow these instructions to avoid
mower damage and possible loss
of warranty.
CONTENTS PAGE PAGE
Preface................................................i
Safety Instructions ................................ii
1. Before Operating..............................1
1.1 Grass Catcher Assembly.................1
1.2 Folding Handles...........................1
1.3 Handle Bar Height........................1
1.4 Engine Lubrication .......................1
1.5 Fuel .........................................1
2. Operation .......................................1
2.1 Installing the Grass Catcher............1
2.2 Removing the Grass Catcher ...........2
2.3 Adjusting the Height of Cut.............2
2.4 To Start the Engine.......................2
2.5 To Stop the Engine ......................2
2.6 Engaging the Drive.......................2
2.7 Disengaging the Drive ...................2
3. Maintenance - General ......................2
3.1 Engine Air Cleaner.......................2
3.2 Snorkel Air Cleaner....................2-3
3.3 Spark Plug .................................3
3.4 Cutting Assembly.........................3
3.5 Blade Change..............................3
3.6 Throttle Control........................... 3
3.7 Wash Port................................3-4
4. Maintenance
Self-Propelled Mowers........................4
4.1 Clutch Adjustment........................4
4.2 Drive Belt Adjustment ...................4
4.3 Drive Wheel Cleaning ...................4
4.4 Drive Pawl Lubrication..................4
4.5 Drive Pinion Lubrication................4
ILLUSTRATIONS
Figure 1. - Grass Catcher Assembly ........1
Figure 2. - Handle Bar Adjustment .........1
Figure 3. - Installing Grass Catcher.........1
Figure 4. - Adjusting Cut Height ............2
Figure 5. - Snorkel Air Intake................3
Figure 6. - Blade Change .....................3
Figure 7. - Blade Attachments ............... 3
Figure 8. - Wash Port Cleaning.............. 4
Figure 9. - Clutch Adjustment ............... 4
Figure10.- Belt Adjustment...................4
Figure 11. - Drive Wheel Cleaning / Lube 4
i
Rover Mowers Limited Rotary Lawnmower
Page 4
1. Run the engine at a moderate speed.
2. Direct water through the wash port.
Figure 8 - Washport Cleaning
4. MAINTENANCE - Self Propelled Mowers
4.1 Clutch Adjustment (Refer Fig. 9)
Every 25 Hours
1. Start engine.
2. Engage drive bale.
3. Rotate thumb wheel (A) anti-clockwise
until the rear wheels drive.
4. Release drive bale.
Figure 9 - Clutch Adjustment
4.2 Drive Belt Adjustment (Refer Fig. 10)
Every 25 Hours
1. Remove the spark plug wire.
2. Raise the rear flap and prop open. (Fig.
6)
3. Remove the back panel.
4. Loosen the gearbox retaining nut. (A)
Figure 10 - Belt Adjustment
5. Tilt the gearbox backwards to tension the
drive belt.
CAUTION
Do not over tension the belt.
6. Tighten the gearbox retaining nut. (A)
7. Replace the back panel.
8. Refit the spark plug wire.
4.3 Drive Wheel Cleaning (Refer Fig. 11)
Every 25 Hours
1. Remove the spark plug wire.
2. Support the rear wheels off the ground
and remove the wheel cap. (A)
3. Remove the ratchet plate (B) retaining the
wheel (C) to the axle.
4. Remove the wheel from the axle and clean
the inside of the wheel hub.
5. Replace the wheel and retain using a new
ratchet plate (B). Replace the wheel cap
and the spark plug wire.
Figure 11 - Drive Wheel Cleaning / Lube
4.4 Drive Pawl Lubrication (Refer Fig. 11)
Every 25 Hours
1. Remove the spark plug wire.
2. Support the rear wheels off the ground.
3. Remove the rear drive wheel cap (A), the
ratchet plate (B) and the drive wheel. (C)
4. Remove the circlip (D) retaining the drive
pinion (E) to the axle and slide the pinion
and washer (F) off the shaft.
5. Lightly grease the pawl (G) and slot
and refit the drive pinion and washer,
retaining them with the circlip. (D)
6. Replace the wheel and retain using a new
ratchet plate and refit the wheel cap.
7. Replace the spark plug wire.
4.5 Drive Pinion Lubrication (Refer Fig. 11)
Every 25 Hours
1. Remove the wheel cap. (A)
2. Support the rear wheels off the ground.
3. Rotate the wheel to align the oil hole (H)
with the pinion gear and apply several
drops of oil.
4. Replace the wheel cap and lower to the
ground.
Rover Mowers Limited Rotary Lawnmower
3700 Rotary Lawnmower.indd 9/20/2004, 9:51 AM2