


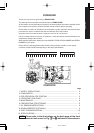


ENGLISH
FRANÇAISE
ESPAÑOL
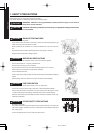
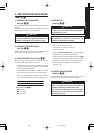
1. WATER (See Fig.
88
88
8
-
qq
qq
q)
Drain all water from the drain plug.
6. PREPARATIONS FOR STORAGE
If you do not use the engine more than 1 month, discharge
fuel to prevent gum in the fuel system and carburetor parts.
Remove the strainer cup, place the strainer over a
container and open the strainer cock to discharge fuel
from the fuel tank.
Remove the drain screw of the carburetor float chamber
and discharge fuel.
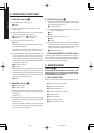
4. ENGINE OIL (See Fig.
88
88
8
-
ee
ee
e)
Change the engine oil with fresh oil.
Remove the spark plug, pour about 5 cc of engine oil
into the cylinder, slowly pull the starter handle of the
recoil starter 2 or 3 times, and reinstall the spark plug.
5. CLEAN AND STORE
Slowly pull the recoil starter handle until resistance is
felt and leave it in that position.
Clean the pump thoroughly with an oiled cloth, put the
cover on, and store the pump indoors in a well ventilated,
low humidity area.
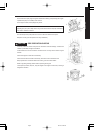
When retightening drain plug, be sure to
clean
the drain plug and the thread of casing.
Otherwise, the thread may be damaged.
CAUTION
2. DISCONNECT THE DELIVERY HOSE
Tilt the pump and drain all water from delivery hole. Severe
damage to pump may result if water freezes in the pumping
chamber.
WARNING Flame Prohibited
3. DISCHARGE FUEL (See Fig.
88
88
8
-
ww
ww
w)
1. FUNCTION OF OIL SENSOR
The engine will stop automatically when the oil level
falls below the safety limit. The engine cannot be
started unless the level is raised above the prescribed
limit. (See Fig.2
-
r)
2. RESTARTING (See Fig.
88
88
8
-
rr
rr
r)
q Oil sensor
(1) Fill the crankcase with oil up to the proper level.
(2) As for restarting and operating the engine, refer to
section “4. OPERATING YOUR PUMP” on page 6.
Check the wire connector from the engine. It must be
connected securely to the wire from oil sensor.
When selecting the engine oil, refer to page 5 for the
recommended oil.
7. OIL SENSOR INSTRUCTIONS
(OPTIONAL)
Prevents the flow of exhaust gas
Reduces engine output
Increases fuel consumption
Makes starting difficult
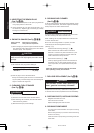
If the engine has been running, the muffler and the spark
arrester will be very hot. Allow the muffler to cool before
cleaning the spark arrester.
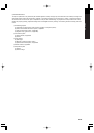
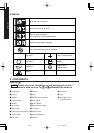
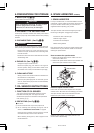
How to remove the spark arrester
1. Remove the flange bolts from the muffler cover and
remove the muffler cover.
2. Remove the special screw from the spark arrester and
remove the spark arrester from the muffler.
Clean the spark arrester screen
Use a brush to remove carbon deposits from the spark
arrester screen. Be careful to avoid damaging the screen.
The spark arrester must be free of breaks and holes.
Replace the spark arrester if it is damaged.
Install the spark arrester, and muffler protector in the
reverse order of disassembly.
1. SPARK ARRESTER
In a dry or wooded area, it is recommendable to use the
product with a spark arrester. Some areas require the use
of a spark arrester. Please check your local laws and
regulations before operating your product.
The spark arrester must be cleaned regularly to keep it
functioning as designed. A clogged spark arrester:
8. SPARK ARRESTER
(OPTIONAL)
SPARK ARESSTER SCREEN
SPARK
ARRESTER
SCREEN
MUFFLER
MUFFLER COVER
06.10.20, 8:09 PMPage 9