


ADJUSTING THE FLEXI-SHELF™ FOR YOUR STORAGE NEEDS
FOR REMOVING THE SHELF FROM BOX
2048-OS AND 204830-OS FLEXI-SHELF™ INSTRUCTIONS
1. Be sure all contents are removed from
shelf.
2. Securely grasp shelf at the right side (fac-
ing box) with both hands and gently lift
(figure 7).
3. Remove from box and store properly.
2048-OS,FlexiShelf-1.eps
Figure 7
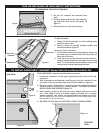
TO INSTALL RAPID PASS™ GROMMET (Model 2048-OS and Model 204830-OS)
"RapidPassThru"-1.eps
Figure 9
"RapidPassThru-2.eps
Figure 10
Figure 11
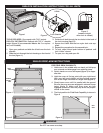
To adjust dividers:
1. Gently lift dividers straight up while holding down
shelf with other hand.
2. Remove divider to desired storage location and
reverse procedure (figure 8).
Securing shelf for transport:
1. To minimize movement during transport, make sure
the shelf front is located behind the stop tabs on
each side of the box.
2. Once the box is on-site the shelf can be moved for-
ward by slightly lifting the front edges over the stop
tabs. The shelf bottom should always lie flat on the
runners when finished adjusting the shelf.
2048-OS,FlexiShelf-2.eps
Figure 8
HAND TOOL
STORAGE
SIDE VIEW
EXTERIOR
VIEW
SCREWDRIVER
"RapidPassThru-3.eps
3
TOOLS REQUIRED- Hammer and flat blade screwdriver.
1.
Locate the “knockout” on the upper right (facing box) corner of the rear
box panel.
2.
With a screwdriver and hammer, carefully punch out the “knockout” from
the inside of the box so that metal ring will fall outside box (figure 9).
3.
Place the rubber “Rapid Pass”™ grommet from the inside of the box in
the hole and be sure that it is properly seated. BE SURE NO SHARP
METAL EDGES ARE EXPOSED (figure 10).
4. When passing cords into the box, be sure to always enter box from the
rear. After head of cord is in place, slightly pull back 2-3” to ensure
weather resistant “star bursts” are facing toward the outside of box (fig
-
ure 11).
Never push the cord from inside the box so that mating plug points
are exposed to the environment
5. BE SURE TO FOLLOW ALL ELECTRICAL SAFETY PRECAUTIONS.
STOP TAB