


25
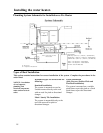
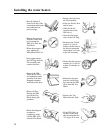
6. Level the tank.
7. Tighten the tank system in place.
8. Tighten hot pipe and downpipe
connections.
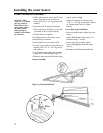
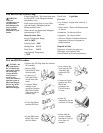
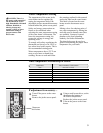
9. Install tee adapter (See figure at
right).
10. Install T/P Valve into tee adaptor
(See figure at right).
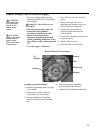
11. Install tail plug in right end of tank
(See figure at left).
11. Continue with plumbing
installation as described in section
below.
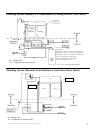
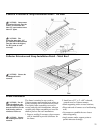
Storage Tank Plumbing Attachment
Detail, Left Side
Tee
Adapter
T&P
Valve
For collector connections see
specific installation diagram
for each model.
Plumbing Installation
CAUTION: If
using teflon tape to seal
T&P valve, make sure
the tape does not block
the water passage.
!
1. Review checklist sketches for roof-
jack location.
2. Mark on the roof the exact location
of roof-jack installation.
3. Install plumbing according to type of
installation on page 17 & 18 and
plumb lines to roof according to Key
to Stub-Outs.
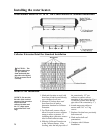
External Piping Insulation
• Where potable water piping is in an
external location or attic space where
the temperature can be as low as 19°F
it must be insulated with a minimum
¾” Armaflex (or similar) flexible
elastomeric closed cell thermal
insulation. Where the temperature can
fall to 12°F the insulation thickness
must be increased to 1 ½”.
• It is recommended that electrical heat
tracing be installed on potable water
piping in areas where the temperature
falls below 32°F for more than 4 hours
with no hot water draw to protect
against pipe freezing.
• Insulation in external locations can
deteriorate through UV radiation. To
prevent this, a layer of outdoor UV
stable paint or other similar protective
coating must be applied to the
insulation.
The following may be performed in any
order necessary:
• If water pressure exceeds 60 psi,
install optional Pressure Regulator on
main supply to building.
• Connect the outlet of the T/P and
pressure relief valve to a suitable open
drain so that the discharge water
cannot contact live electrical parts and
to eliminate potential water damage.
DANGER: Hotter water increases the
potential for Hot Water SCALDS.
• Piping used should be of a type
approved for hot water distribution.
• The discharge line must not be smaller
than the outlet of the valve and must
pitch downward from the valve to
allow complete drainage (by gravity)
of the relief valve and discharge line.
• The end of the discharge line should
not be threaded or concealed, and
should be protected from freezing.
• No valve of any type, restriction or
reducer coupling should be installed in
the discharge line.
NOTICE:
1. All plumbing installation must
conform to local codes.
2. All piping must be adequately
supported, supports must conform
to local codes.
3. All piping must be adequately
insulated, insulation must conform
to local codes.
4. All piping must slope to drain.
!
CAUTION:
Plumbing must be
installed so that the
performance of any
fire rated assembly
is not reduced.
!
NOTICE: The
location of the roof
jack may vary
depending on
installation type.
NOTICE: The
closed loop piping
between the storage
tank and solar
collectors does not
require insulation.
WARNING:
Heat trace will not
protect against
pipe freezing in the
event of power loss.
Tail
Plug
Downpipe
Connection