13
111219 www.desatech.com
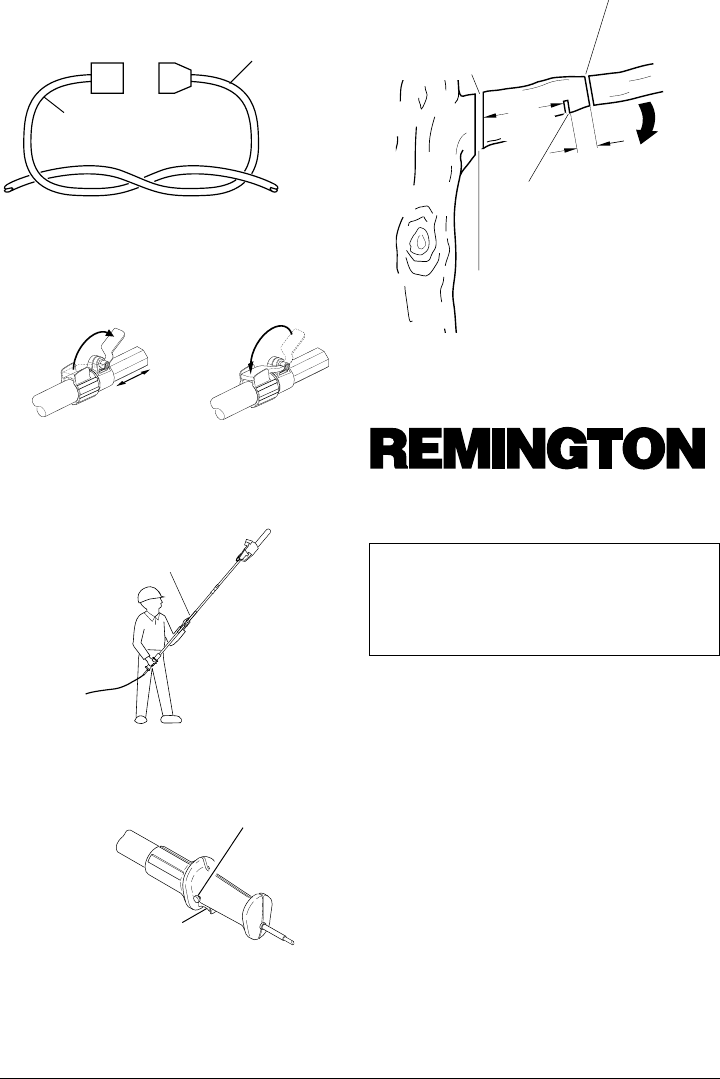
Figure 9 - Cutting A Limb
Figura 9 - Poda de una rama
Figure 9 - Coupe d’une branche
2" to 4"
(5 a 10 cm)
2nd Cut - Pruning Cut (to avoid pinching)/2do corte:
Poda preliminar (para evitar la compresión durante
la poda final)/2ème entaille - entaille d’élagage pour
éviter le pincement
1st Cut - Pruning Undercut (to avoid
splintering)/1er corte: Corte inferior
(para evitar la formación de
astillas)/1ère entaille - entaille par le
dessous pour éviter les éclats
3rd Cut - Stub Undercut (to avoid
splintering)/3er corte: Corte inferior (para
evitar la formación de astillas)/3ème
entaille - entaille par le dessous du reste
de la branche pour éviter les éclats
6"
(15 cm)
4th Cut - Final Stub Cut / 4to corte:
Poda final/4ème entaille - entaille
finale du reste de la branche
FIGURES/FIGURAS/FIGURES
Continued/Continúa/À suivre
Figure 6 - Extending Telescopic Pole
Figura 6 - Extendiendo la Pértiga Telescópica
Figure 6 - Extension de la perche télescopique
Figure 8 - Pole Saw Handle with Trigger Switch
Lock-out
Figura 8 - Mango de la Sierra de Pértiga con el
Bloqueo del Interruptor de Gatillo
Figure 8 - Poignée de la scie à perche avec
verrouillage d’interdiction de la gâchette
Trigger Switch Lock-out/Bloqueo del Interruptor de
Gatillo/Verrouillage d’interdiction de la gâchette
Extension Cord/Cable
Flexible de Extensión/
Câble de rallonge
Chain Saw Power Cord/Cable Flexible de
Alimentación de la Sierra de Cadena/
Cordon d’alimentation de la tronçonneuse
Figure 5 - Tying Extension Cord and Power Cord
in Knot
Figura 5 - Amarre del Cable de Extensión con el
Cable de Alimentación usando un Nudo
Figure 5 - Comment attacher ensemble le câble
de rallonge et le cordon d’alimentation de la scie
Grip Area/Área de Agarre/Prise
Figure 7 - Designated Grip Areas
Figura 7 - Áreas de Agarre Designadas
Figure 7 - Parties désignées pour la prise
UNLOCK/
DESBLOQUEADO/
DÉVERROUILLÉE
LOCK/
BLOQUEADO/
VERROUILLÉE
Trigger Switch/Interruptor de
Gatillo/Gâchette
®
MODEL RPS2N1: 106821A
IMPORTANT: Read and understand this
manual before assembling or operating
this chain saw. Improper use of saw can
cause severe injury. Keep this manual
for future reference.
UNPACKING
1. Remove all items from carton.
2. Check all items for any shipping damage. If you find
any damage or if any parts are missing, promptly
inform dealer where you bought the Pole Saw.
POLE SAW NAMES AND
TERMS
Clamping Lever Lever is loosened to allow inner pole
to be adjusted and tightened to hold pole in position.
Guide Bar Metal bar that extends from saw body.
The guide bar supports and guides chain.
Inner Pole The moveable section of tubing to which
the saw is attached.
Kickback Quick backward and upward motion of
guide bar. Kickback may occur when tip of guide
bar touches an object while chain is moving. The
guide bar will kick up and back towards operator.
ELECTRIC CHAIN SAW
Continued


