18
EspañolEnglish
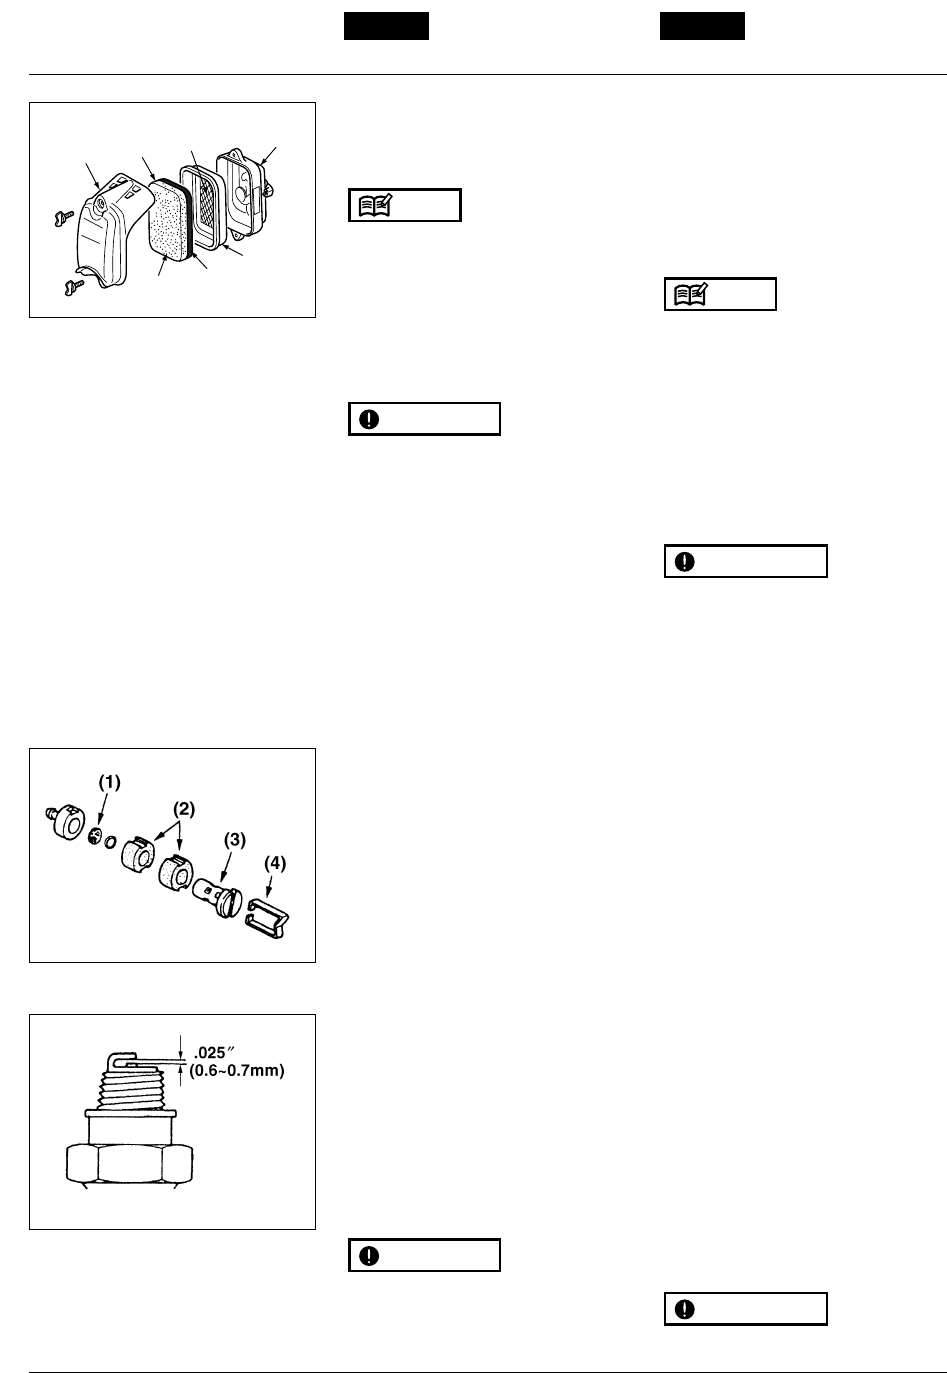
(1) Cover Cleaner (5) Packing
(2) Screen (6) Yellow
(3) Cleaner Body (7) Black
(4) Element
• Assure that the screen is securely fitted
to the packing. Fit securely if it is loose.
• Insufficient fixing of screws may cause
fall off of the cover and insufficient
sealing.
• Care shall be taken to an direction of
the filter element. Incorrect direction of
the element will result in poor element
performance.
Place the filter element into the packing
with the yellow side facing to the cover.
Set the packing into the air cleaner body.
Set the cover with 2 fixing screws.
■ FUEL FILTER
•A clogged fuel filter may cause poor
acceleration of the engine. Check
periodically to see if the filter is clogged
with dirt. The filter can be taken out of
the fueling port using a small wire hook.
Disconnect the filter assembly from the
fuel pipe and unhook the retainer to
disassemble it. Clean the components
with gasoline.
(1) Screen (3) Holder
(2) Element (2) (4) Retainer
■ SPARK PLUG
• The spark plug may gather carbon
deposits on its firing end with
reasonable use. Remove and inspect
the spark plug every 25 hours and
clean the electrodes as necessary with
a wire brush. The spark gap should be
adjusted to .025 in (0.6~0.7mm).
• Plug manufacturers recommend
replacing the plug twice a year to avoid
unexpected plug failure in a job.
REPLACEMENT PLUG IS NGK
CMR7H or CHAMPION RZ7C.
• Note that using any spark plugs other
than those designated may result in the
engine failing to operate properly or in
the engine becoming overheated and
damaged.
IMPORTANT
IMPORTANT
NOTE
Maintenance
cara hacia la cubierta. Instale la
empaquetadura en el cuerpo del
depurador de aire. Instale la cubierta y
asegúrela con 2 tornillos de fijación.
(1) Cubierta del depurador (5) Empaquetadura
(2) Tamiz (6) Amarillo
(3) Cuerpo del depurador (7) Negro
(4) Elemento
• Asegúrese de que el tamiz quede
firmemente encajado en la
empaquetadura. Asegúrelo si está
suelto.
• Asegúrese de apretar bien los tornillos
de fijación; de lo contrario, la cubierta
podrá salirse y el sellado podrá ser
insuficiente.
• Asegúrese de instalar el elemento de
filtro en la dirección correcta. Si lo
instala en la dirección incorrecta, el
elemento no funcionará bien.
Ponga el elemento de filtro en la
empaquetadura con el lado amarillo de
cara hacia la cubierta. Instale la
empaquetadura en el cuerpo del
depurador de aire. Instale la cubierta y
asegúrela con 2 tornillos de fijación.
■ FILTRO DE COMBUSTIBLE
• Un filtro de combustible puede causar
una aceleración débil del motor.
Inspeccione periódicamente el filtro
para ver si está obstruido con suciedad.
El filtro puede sacarse por la lumbrera
de carga de combustible utilizando un
gancho de alambre. Desconecte el
conjunto del filtro del tubo de
combustible y desenganche el
retenedor para desarmarlo. Limpie los
componentes con gasolina.
(1) Tamiz (3) Soporte
(2) Elemento (2) (4) Retenedor
■ BUJÍA
• En el extremo de encendido de la bujía
pueden acumularse depósitos de
carbón con el uso normal del aparato.
Retire e inspeccione la bujía cada 25
horas de uso y limpie los electrodos
según sea necesario con un cepillo de
alambre. La separación de los
electrodos de la bujía debe ajustarse a
0,25 pulg. (0,6 – 0,7 mm).
• Los fabricantes de bujías recomiendan
reemplazar la bujía dos veces por año
para evitar fallos inesperados durante
la realización de un trabajo.
BUJÍA DE RECAMBIO: NGK CMR7H
o CHAMPION RZ7C.
• Tenga presente que el uso de bujías
distintas de las especificadas puede
IMPORTANTE
IMPORTANTE
NOTA
Mantenimiento
(1)
(2)
(3)
(5)
(6)
(7)
(4)
F11
F12
F13


