


COMMISSIONING
WARNING: COMMISSIONING MUST ONLY BE
UNDERTAKEN BY A PROPERLY AUTHORISED
AND IN SOME CASES APPROPRIATELY
LICENSED PERSON WHO IS FAMILIAR WITH
SAFE COMMISSIONING PROCEDURES. THE
COMMISSIONING MAY REQUIRE
INSPECTION BY THE GAS SUPPLY
AUTHORITY, CHECK IF THIS IS APPLICABLE.
RECOMMENDED
COMMISSIONING PROCEDURE.
1. Check that all necessary approvals and
appropriate documents have been obtained.
2. Ensure that the heater is clean and the
surrounding area is clear of all combustible and
flammable materials.
3. Remove all liquids and chemicals from the
plant room and check that combustion air
openings are not obstructed. Chemicals must not
be stored in the plant room - this is extremely
dangerous and may damage the heater.
4. Fill the system with water and expel any air
as required.
5. Purge all air from gas supply piping.
CAUTION: Liquid Propane Gas is heavier than
air and sinks to the ground, exercise extreme
care in lighting boiler in confined areas.
6. Test ALL gas connections for leaks, using
soapy water and a manometer.
(NOT A NAKED FLAME)
7. Conduct a visual inspection of the heater
and equipment for any damage or installation
problems and report as necessary.
8. Check that the correct power supply is
available and the circulation pump is
electrically interlocked with the heater.
9. Check that the ventilation to the plant room
complies with Raypak requirements, AG601
and local authority regulations.
If mechanical ventilation is provided, check its
operation and any interlocks.
10. Check that the flue complies with the
appropriate regulations and is fitted with an
approved termination cowl.
11. Check that the gas supply is isolated and
with the main gas valve isolation switch turned
off, check the boiler gas train and components
for gas escapes.
12. Start the circulation pump and verify the
pressure switch operation, then test the
operation of the heater with no gas flow to
confirm its operation up to the lockout status.
Pressure switch adjustment is required if the
unit won’t fire and after faultfinding it is verified
that the pressure switch has not closed.
Adjust the pressure setting at the thumbwheel
to a lower setting, then re start the heater.
If the heater fires up but won’t shutdown when
the water is reduced then it will require
adjustment to the thumbwheel to a
higher setting and the heater restarted.
(In some cases the electrical interlock between
the pump and heater may require a temporary
disconnection to carry out tests.)
13. Open the gas supply valve, switch on the
main valve isolation switch and reset the
ignition control to fire the heater.
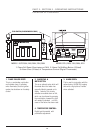
14. When the unit fires and reaches high fire,
set the burner gas pressure to that shown on
the data plate which is located on
the front of the heater.
15. Verify that the high limit and any other
safety devices are operating correctly.
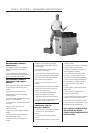
16. Check the water temperature rise of the
heater and adjust the water flow as necessary.
For models 538-1292, measure the
temperature difference between the Inlet and
Outlet pipes at the heater, with the unit at full
fire.
The difference should be approximately 5 - 10
Deg. C.
If it is lower than recommended, decrease the
water flow through the heater.
If it is higher than recommended it indicates
that the water flow rate is too low.
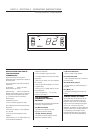
For models 1362 to 4224, the temperature
gauges which are fitted to the heater can be
used as a guide.
The objective is to maintain a temperature of
approximately 50 Deg C at the outlet side of
the heater, 30 Deg C at the inlet side, with the
unit at full fire.
The digital display on the electronic thermostat
will indicate the pool water temperature.
17. Check that the flue is operating correctly
or if there is evidence of Down draft etc report
as necessary.
18. Check operation of any water pressure
relief valves etc and set up the controls to
desired settings.
19. Ensure that the customer is supplied with
this manual and you have demonstrated the
operation of the unit etc.
It is quite normal for the heater to produce
some smoke and possible condensation for the
first thirty (30) minutes of firing from new.
WARNING - Should overheating occur or the
gas fail to shut off, turn off the gas isolation
valve adjacent to the heater and then
examine the unit or call for assistance.
10
PART 2 - SECTION I - INSTALLATION INSTRUCTIONS