13
WARNING: Never turn saw upside
down to undercut. The saw cannot be con-
trolled in this position.
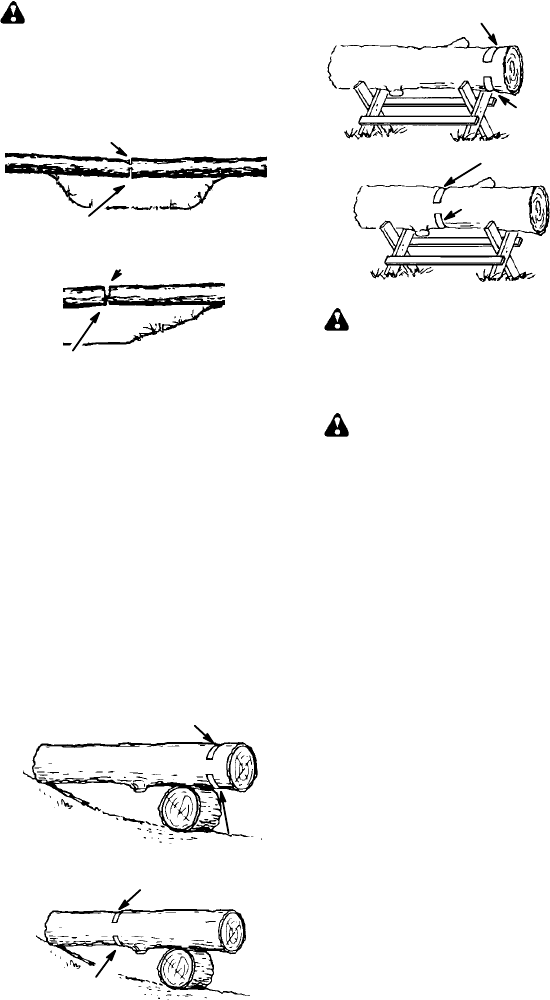
Always make your first cut on the compres-
sion side ofthe log. Thecompression sideof
the log is w here the pressure of t h e log’s
weight is concentrated.
Second cut
First cut on compression side of log
First cut on compression side of log
Second cut
BUCKING WITHOUT A SUPPORT
S Overcut through 1/3 of the diameter of the
log.
S Roll the log over and finish with a second
overcut.
S Watch for logs with a compression side to
prevent the saw from pinching. See il-
lustrations for cutting logs with acompres-
sion side.
BUCKING USING A LOG OR
SUPPORT STAND
S Remember your first cut is always on the
compression side of the log.
(Refer to the illustrations below for your
first and second cut)
S Your first cut should extend
1/3 of the
diameter of the log.
S Finish with your second cut.
1
st
Cut
2
nd
Cut
Usingalogforsupport
2
nd
Cut
1
st
Cut
1
st
Cut
2
nd
Cut
Using a support stand
1
st
Cut
2
nd
Cut
LIMBING AND PRUNING
WARNING: Be alert for and guard
against kickback. Do not allow the moving
chain to contact any other branches or objects
at the nose of the guide bar when limbing or
pruning. Allowing such contact can result in
serious i njury .
WARNING: Neverclimbintoatreeto
limb or prune. Do not stand on ladders, plat-
forms, alog, or inany position which can cause
you to lose your balance or contro l of the saw .
IMPORTANT POINTS
S Work slowly , keeping both hands firmly
gripped on the saw . Maintain secure footing
and balance.
S Watch out for springpoles. Springpoles are
small size limbs which can catch the saw
chain and whip toward youor pull you offbal-
ance. Use e xtreme caution when cutting
small size limbs or slender material.
S Be alert for springback. Watch out for
branches that are bent or under pressure.
Avoid being struck by the branch or the
saw when the tension in the wood fibers is
released.
S Keep a clear work area. Frequently clear
branches out of the way to avoid tripping
over them.
LIMBI NG
S Always limbatreeafter itis cutdown. Only
then can limbing be done safely and prop-
erly.
S Leave the larger limbs underneath the felled
tree to support the tree as you work.
S Start a t the base of the felled tree and work
toward the top, cutting branches and limbs.
Remove small limbs with one cut.
S Keep t he tree between you and the chain.
Cut from the side of the t ree opposite the
br a n ch you are cutt i n g .
S Remove larger , supporting br anches with
the cutting techniques described in BUCK-
ING WIT HOUT A SUPPORT.
S Always use an overcut to cut small and free-
ly hanging limbs. Undercutting could cause
limbs to fall and pinch the saw .


