


11
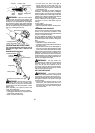
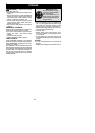
Tip of the line
does the cutting.
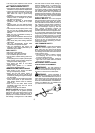
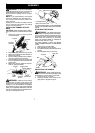
Right Wrong
Line crowded into
work area.
S The line will easily remove grass and
weedsfromaroundwalls,fences, treesand
flower beds, but it also can cut the tender
bark of trees or shrubs and scar fences.
S For trimming or scalping, use less than full
throttle to increase line life and decrease
head wear, especially:
S During light duty cutting.
S Near objects around which the line can
wrap such as small posts, trees or fence
wire.
S Formowingor sweeping, usefullthrottlefor
a good clean job.
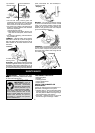
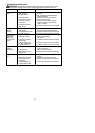
TRIMMING -- Hold the bottom of the trimmer
head about 3 inches (8 cm) above the ground
and at an ang le. All ow only the tip of the line t o
make contact. Do not force trimmer line into
work area.
Trimming
3 inches (8 cm)
above ground
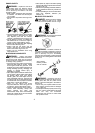
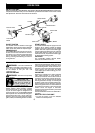
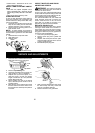
SCALPING -- The scalping technique removes
unwanted vegetation down to the ground. Hold
the bottom of the trimmer head about 3 in. (8
cm) above theground andat anangle. Allow the
tip of the line to strike the ground around trees,
posts, monuments, etc. This technique in-
creases line wear .
Scalping
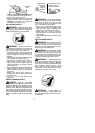
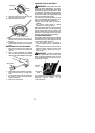
MOWING -- Your trimmer is ideal for mowing
in places conventional lawn mowers cannot
reach. In the mowing position, keep the line
parallel to the ground. Avoid pressing the
head into the ground as this can scalp the
ground and damage the tool.
Mowing
SWEEPING -- The fanning action ofthe rotat-
inglinecanbeusedto blowaway loosedebris
from an area. Keep the line parallel to and
above the area surface and swing the tool
from side to side.
Sweeping
MAINTENANCE
WARNING: Disconnect the spark
plug before performing m aintenance except
for carburetor adjustments.
HELPFUL TIP
IMPORT ANT: Have all
repairs other than the rec-
ommended maintenance
described in the instruction
manual performed b y an
authorized service dealer.
If any dealer other than an authorized
service dealer performs work on the
product, Poulan PRO may not pay for
repairs under warranty. It is your re-
sponsibility to ma intain and perform
general maintenance.
CHECK FOR LOOSE
FASTENERS AND PARTS
S Spark Plug Boot
S Air Filter
S Housing Screws
S Assist Handle Screw
S Debris Shield
CHECK FOR DAMAGED OR
WORN PARTS
Contact a n authorized service dealer for re-
placement of damaged or worn parts.
S ON/OFF Switch -- Ensure ON/OFF switch
functions properly by m oving the switch to
the OFF position. Make sure engine stops;
then restart engine and continue.
S Fuel Tank -- Discontinue use of unit if fuel
tank shows signs of damage or leaks.