


8
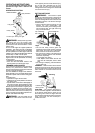
Air Filter Cover
Air Filter
Button
MUFFLER AND SPARK ARREST -
ING SCREEN
WARNING: The m uffler on th is prod-
uct contains chemicals known to the State of
California to cause cancer .
As your unitis used, carbondeposits buildup
on the m uffler and spark a rresting screen.
For normal homeowner use, however , the
mufflerand spark arresting screen will n otre-
quire any service. After 50 hours of use, we
recommend that your muffler be serviced or
replaced by your auth orized service dealer.
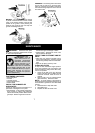
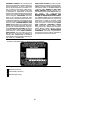
REPLACE SPARK PLUG
Replace the spark plug each year to ensure
the engine starts easier and runs better. Set
spark plug gap at 0.025 inch (0.6 mm). Igni-
tion timing is fixed and nonadjustable.
1. Twist, then pull off spark plug boot.
2. Remove spark plug from cylinder and
discard.
3. Replace with Champion RCJ-6Y spark
plug and t ighten securely with a 3 /4 inch
(19 mm) socket wrench.
4. Reinstall the spark plug boot.
SERVICE AND ADJUSTMENTS
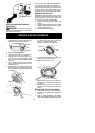
REPLACING THE LINE
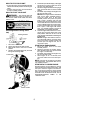
1. P ress the tabs on the side of thetrimmer
head and remove cover and spool.
Tab
Cover
Tap Button
2. Remove any remaining line.
3. Clean dirt and debris from all parts. Re-
place spool if it is worn or damaged.
4. Replace with a pre-wound spool, or re-
place line using a 13 feet length o f 0 .095
inch (2.4 mm) diameter WEED EA TER
brand line.
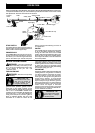
5. W hen installing new line on an existing
spool, hold the spool as shown in the il-
lustration below.
6. B end the line at the midpoint and insert
the bend into the slot in the center rim of
the spool.Ensure linesnaps intoposition
in the slot.
Slot
Spool
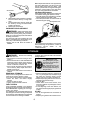
7. With your finger between t he lines, wrap
the lines evenly and firmly around the
spool in a clockwise direction.8.
Position the lines i n the guide slots.
Guide
Slot
Guide Slot
9. Insert the ends of the lines through exit
holes in the sides of the cover .
10. Place the spool in the cover.
Spool
Cover
11. Make sure the lines are not caught be-
tween the rim of thespool andthe wallof
the cover.
12. Reinstall the spool and cover onto the
trimmerhead.Pushuntilcover snapsinto
place.
REPLACING THE CUTTING HEAD
1. Alig n holein the dust cup with the hole in
the side of the gearbox by rotating the
dust cup.
2. I nse rt a smal l screwdri ver int o alig n e d
holes. This will keep the shaft from turning
while removing andinstalling trimmer head.