


4
FUEL YOUR UNIT
This engine is certified to operate on un-
leaded gasoline. Gasoline must be mixed
with a good quality 2-cycle air-cooled engine
oil designed to be mixed at a ratio of 40:1.
Poulan/Weed Eater
r
brand oil is recom-
mended. (A 40:1 ratio is obtained by mixing
3.2 ounces of oil with 1 gallon of unleaded
gasoline). When mixing fuel follow the
instructions printed on the container. Always
read and follow the safety rules under FUEL
SAFETY.
STARTING
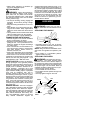
Starting Position
HOW TO STOP YOUR UNIT
To stop engine, move ON/OFF switch to the
OFF position.
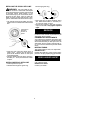
Choke lever
Primer Bulb
Trigger
Muffler
HOW TO START YOUR UNIT
WARNING:
The trimmer head will
turn while starting the engine. A hot muffler
can cause serious burns.
STARTING A COLD ENGINE (or a
warm engine after running out of
fuel)
S
Set uni t on a flat s urface.
S
Move ON/OFF switch to the ON position.
S
Slowly press the primer bulb 6 times.
S
Move c hoke lever to FULL CHOKE posi-
tion.
S
Squeeze the throttle trigger fully and hold
through
all remaining steps
.
S
Pull starter r ope handle sharply 6 times.
S
Move choke lever t o HALF CHOKE posi-
tion.
S
Pull starter rope handle no more than 6
pulls, until engine runs.
S
Allow engine to run 10 seconds, then move
choke lever to OFF CHOKE position.
RESTARTING A WARM ENGINE
S
Move ON/OFF switch to the ON position.
S
Move choke lever to OFF CHOKE position.
S
Pull starter r ope handle until engine runs.
S
If engine does not start in 5 pulls, follow
instructions in STARTING A COLD EN-
GINE.
USING YOUR UNIT
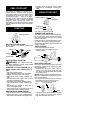
OPERATING POSITION
Eye
Protection
Long P ants
Heavy Shoes
ALWAYS WEAR:
Cut from your right t o your left.
TRIMMER LINE ADVANCE
The cutting head advances line automatically.
Do not tap head on the ground to advance
line. This may break parts and cause cutting
head t o malfunction.
Upon unit start up, the line will advance auto-
matically to the correct cutting path length.
Always keep the shield in place when the tool
is being operated.
TWIST--N-- EDGE
S
Pull the tab toward the engine.
S
Twist the tube to the edging position;
release the tab.
Tab
REPLACING THE LINE
Pre--wound spools offer the most convenient
method for r eplacing line and ensuring opti-
mum performance.
S
Replacement spools are color--coded to
ensure use of the correct spool with your
unit. Be sure to use t he same c olor spool as
the existing spool.
NOTE:
Always clear dirt and debris from cut-
ting head components when performing any
type of maintenance.
S
Hold spool and unscrew cap by t urning in
the direction shown on top of the cap.
S
Remove l ine guide ring and spool.
Cap
Spool
Line guide ring
S
Use a pre--wound spool or refill s pool with
line. If using a pre--wound spool, remove
tape strip from line and spool.