


6
S
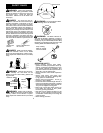
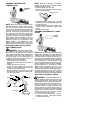
Place the m etal shield under the gearbox ,
and align the screw holes.
Shield
Gearbox
S
Insert and thread the 4 mounting screws
through the holes of the gearbox and the
metal shield. Tighten evenly and securely
with the hex wrench provided.
INSTALLATION OF THE METAL
BLADE
WARNING:
Donot useany blades, or
fastening hardware other than the washers and
nuts show n in t h e fo llowing illustr a tion s . The s e
parts must be provided by Poulan/Weed Eater,
and installed as shown below. Failure to use
proper parts can cause the blade t o fly off and
seriously hurt you or others.
NOTE:
The dustcup is located on the gearbox
and not in the parts bag. All other fastening
hardw are mentioned i n the f ollowing assembly
steps is located in the parts bag.
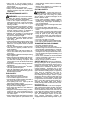
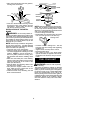
S
Leave the dust c up on the gearbox.
S
Install the blade and the retaining was her
over the threaded shaft extending from the
gearbox.
NOTE
:
It may be necessary to
remove a plastic protective covering from
the threaded shaft before installing these
parts.
S
Make sure the r aised part of the retaining
washer is facing the gearbox and theraised
area fits into the hole in the center of the
blade (see illustration).
S
Slide the blade and retaining washer onto
the shaft of the gearbox.
S
Now place the cupped washer onto the
shaft. Make sure the cupped side of t he
washer is toward the blade.
S
Install the blade nut by threading onto the
shaft counterclockwise.
Shield
Blade
Retaining
Washer
Dust Cup
Cupped
Washer
Nut
Threaded Shaft
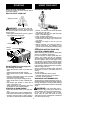
NOTE:
Mak esureallpartsareinplace a sillus-
trated, and the blade is sandwiched between
the dust cup and the retaining washer. Ther e
should be no space between the blade and the
dust cup or the retaining washer.
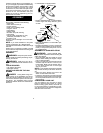
S
Push in locking lever and hold.
S
Rotate blade nut until the locking lever falls
into one of the grooves in the dust cup.
Locking Lever
S
Continue to hold i n locking l ever. This will
keep the shaft from turning while tightening
the blade nut.
S
Tighten blade nut firmly with a wrench.
S
Release locking l ever .
S
Turn blade by hand. If the blade binds
against the shield, or appears tobe uneven,
the blade is not centered, and you must re-
install.
FUEL YOUR UNIT
WARNING:
Remove fuel cap slowly
when refueling.
This engine is certified to oper ate on unleaded
gasoline. Gasoline m ust be mixed with a good
quality 2-cycle air-cooled engine oil designed to
be mixed at a ratio of 40:1. Poulan/Weed Eater
brand oil is recommended. (A 40: 1 ratio i s ob-
tainedby m ixing3.2ounces ofoil w ith1 gallonof
unleaded gasoline). When mixing fuel followthe
instructions printed on the container. Always
read and follow the saf ety rules under FUEL
SAFETY.