


13
OPERATION
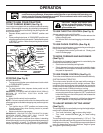
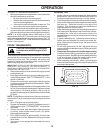
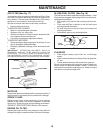
TO OPERATE MOWER (See Fig. 10)
Your tractor is equipped with an operator presence sensing
switch. Any attempt by the operator to leave the seat with
the engine running and the attachment clutch engaged will
shut off the engine.
• Select desired height of cut.
• Lower mower with attachment lift control.
• Start mower blades by engaging attachment clutch
control.
• TO STOP MOWER BLADES - disengage attachment
clutch control.
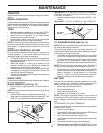
FIG. 9
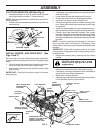
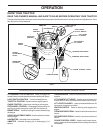
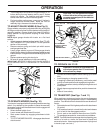
TO ADJUST GAUGE WHEELS (See Fig. 9)
Gauge wheels are properly adjusted when they are slightly
off the ground when mower is at the desired cutting height in
operating position. Gauge wheels then keep the deck in
proper position to help prevent scalping in most terrain
conditions.
NOTE:Adjust gauge wheels with tractor on a flat level
surface.
• Adjust mower to desired cutting height (See “TO AD-
JUST MOWER CUTTING HEIGHT” in the Operation
section of this manual).
• Remove retainer spring and clevis pin which secure
each gauge wheel bar.
• Lower gauge wheels to ground. Raise gauge wheels
slightly to align holes in bracket and gauge wheel bar and
insert clevis pin. Gauge wheels should be slightly off the
ground.
• Replace retainer spring into clevis pin.
• Be sure all gauge wheels are in the same setting.
IMPORTANT: BE SURE TO READJUST GAUGE WHEELS
IF YOU CHANGE THE CUTTING HEIGHT OF THE MOWER
DECK.
• The average lawn should be cut to approximately 2-1/2
inches during the cool season and to over 3 inches
during hot months. For healthier and better looking
lawns, mow often and after moderate growth.
• For best cutting performance, grass over 6 inches in
height should be mowed twice. Make the first cut
relatively high; the second to desired height.
CLEVIS
PIN
RETAINER
SPRING
CAUTION: Do not operate the mower
without either the entire grass catcher,
on mowers so equipped, or the deflector
shield in place.
TO OPERATE ON HILLS
WARNING: Do not drive up or down hills
with slopes greater than 15° and do not
drive across any slope.
• Choose the slowest speed before starting up or down
hills.
• Avoid stopping or changing speed on hills.
• If stopping is absolutely necessary, push brake pedal
quickly to brake position and engage parking brake.
• To restart movement, slowly release parking brake and
brake pedal.
• Slowly depress appropriate drive pedal to slowest set-
ting.
• Make all turns slowly.
TO TRANSPORT (See Figs. 7 and 11)
When pushing or towing your tractor, be sure to disengage
transmission by placing freewheel control in freewheeling
position. Free wheel control is located at the rear drawbar of
tractor.
• Raise attachment lift to highest position with attachment
lift control.
• Pull freewheel control out and into the slot and release
so it is held in the disengaged position.
• Do not push or tow tractor at more than two (2) MPH.
• To reengage transmission, reverse above procedure.
NOTE: To protect hood from damage when transporting your
tractor on a truck or a trailer, be sure hood is closed and
secured to tractor. Use an appropriate means of tying hood
to tractor (rope, cord, etc.).
ATTACHMENT
CLUTCH SWITCH
PUSH IN TO
"DISENGAGED"
ATTACHMENT LIFT LEVER HIGH POSITION
PULL OUT TO
"ENGAGE"
LOW
POSITION
FIG. 10
DEFLECTOR SHIELD