16
CLEANING THE SPARK ARREST-
ING SCREEN
Cleaning is required every 25 hours of op-
eration or annually, whichever comes first.
1. Loosen andremove the nutfromthe e x-
haust outlet cover .
2. Remove the exhaust oulet cover.
3. Removespark arrestingscreen.Handle
screen carefully to prevent damage.
4. Clean the spark arresting screen gently
with a wire brush. Replace screen if
breaks are found.
5. Replace any broken or cracked muffler
parts.
6. Reinstall spark arresting screen, exhaust
outlet cover , and nut. Tighten nut securely.
REPLACE SPARK PLUG
The spark plug should be replaced each
year to ensure the engine starts easier and
runs better . Ignition timing is fixed and non-
adjustable.
NOTE: This spark ignition system complies
with the Canadian standard ICES--002.
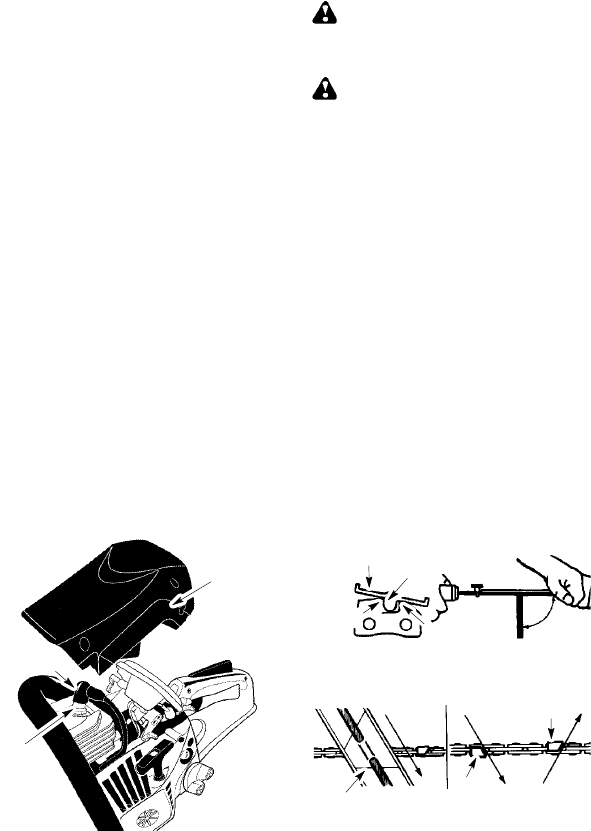
1. Loosen 3 screws on cylinder cover .
2. Remove the cylinder cover.
3. Pull off the spark plug boot.
4. Remove spark plug from cylinder and
discard.
5. Replace with Champion RCJ--7Y spark
plug and tighten securely with a
3
/
4
inch
(19 mm) socket wrench. Spark pluggap
should be 0.025 inch (0,6 mm).
6. Reinstall the spark plug boot.
7. Reinstall the cylinder cover and 3
screws. Tighten securely.
Spark
Plug
Cylinder
Cover
Spark
Plug Boot
REPLACE FUEL FILTER
To replace fuel filter, drain your unit by run-
ning it dry of fuel. Remove fuel cap and its
connected retainer from tank. Pull filter from
tank and remove from line. Replace and re-
assemble.
CHAIN A DJ U S TMENT
See CHAIN TENSION in ASSEMBLY section.
CHAIN S H ARPENING
WARNING: Improper chain sharp-
ening techniques and/or depth gauge mainte-
nance will increase the chance of kickback
which can result in serious injury.
WARNING: W ear protective gloves
when handling chain. The chain is sharp and
can cut you even when it is not moving.
Conditions which indicate the need for chain
sharpening:
S Reduction in size of wood chips. The size
ofthe woodchipwill decreaseas thechain
gets duller until it becomes more like a
powder than a chip. Note that dead or
rotted wood will not produce a good chip.
S Saw cuts to one side or at an angle.
S Saw has to be forced through the cut.
Too ls required:
S 5/32 inch (4 mm) diameter round file and
file holder
S Flat file
S Depth gauge tool
TO SHARPEN CHAIN:
1. Move ON/STOP switch to the STOP
position.
2. Check chain for proper tension. Adjust
chain tension if necessary. See CHAIN
TENSION section.
3. Sharpen cutters.
S To sharpen the cutters, position the
file holder level (90˚) so that it rests
on the top edges of the cutter and
depth gauge.
NOTE: The chain has both left and
right hand cutters.
Depth Gauge
File
File Holder
Cutter
90˚
S Align the 30˚ fileholder marks paral-
lelwiththebar andto thecenterofthe
chain.
Cutter
Cutter
30˚
File Holder Line
S Sharpen cutters on one side of t he
chain first. File from the inside of each
cutter to the outside. Then, turn the
chain saw around and repeat the pro-
cess for the other side of the chain.
S Fileonthe forward stroke only.Use2
or 3 strokes per cutting edge.
S Keep all cutters the same length
when filing.
S File enough to remove any damage
to cutting edges (side plate and top
plate of cutter).


