


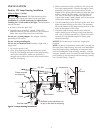

Lamp Installation Instructions (Re-lamping)
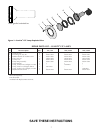
See Figure 2, Page 7, for Key numbers.
1. Be sure that the power is off. Allow the lamp to cool
before relamping.
2. Remove the leader screw (Key No. 1) from the face
ring and lift the lamp housing up and out of the
niche.
3. Loosen the screw and nut on the clamp ring assembly
(Key No. 5) until the nut is near the end of the screw.
Swing the screw and nut out of the forked slot of the
clamp ring assembly and bend the clamp ring open
to about 4 inches.
4. To relamp 120V model, remove the lamp by turning
it counterclockwise and pulling it straight out.
Replace with an equivalent lamp. For the 12V model,
remove the lamp by pulling it straight out while hold-
ing the spring clip back (away from the socket).
Replace with an equivalent lamp.
5. Using a clean soft lint free cloth, carefully wipe all
sealing surfaces on the lamp housing and lens.
NOTE: Do not touch the lamp with your bare fingers. If
contact occurs, clean the lamp glass with alcohol and a
clean cloth.
6. To close the fixture, make sure the clamp ring is open
to about 4 inches and that the nut is at the end of the
leader screw.
7. Lay the face ring face down on a flat surface.
Carefully align the clear lens (Key No. 4) and lens
gasket (Key No. 5) over the flanged hole in the face
ring (key No. 2), with the word “top” on the lens
lined up with the leader screw on the face ring. The
silver tape should be on top and the arrow pointing
toward the lamp.
8. Align the lamp housing over the lens gasket with the
word “top” inline with the leader screw in the face
ring.
9. Position one half of the clamp ring around the metal
flanges of the face ring and lamp housing.
10.Close the clamp ring, fitting the other half over the
same flanges.
11. Swing the nut and screw into the slotted end of the
clamp assembly. Tighten this screw securely (20 inch-
pounds torque) to insure good electrical bonding.
12.To replace the lamp housing in the pool wall hook
the bracket at the bottom of the niche and tighten the
leader screw on the face ring of the lamp housing.
6